Welcome to the second part of my blog series about creating an immersive FPS in Unreal Engine 4! In this part, we’ll be taking a look at a crucial step for setting up the character’s viewpoint using Inverse Kinematics for the character mesh’s hands as well as creating a more precise method of aiming using a deadzone free aim system.
At the end of this part, our character will be able to hold the weapon in any desired pose based on location and rotation values, which will also enable the use of procedural arm animations for actions such as aiming down sights and pumping the action in later parts!
Series Index:
- Intent, Setup, & True First Person Character
- Hand IK and Deadzone Rotation
- Aiming Down Sights with Procedural Animation…and Math!
- Firing Projectiles and Controlling the Pump Action
- Procedural Recoil Animations
- Manual Reloading Controls and Procedural Animations
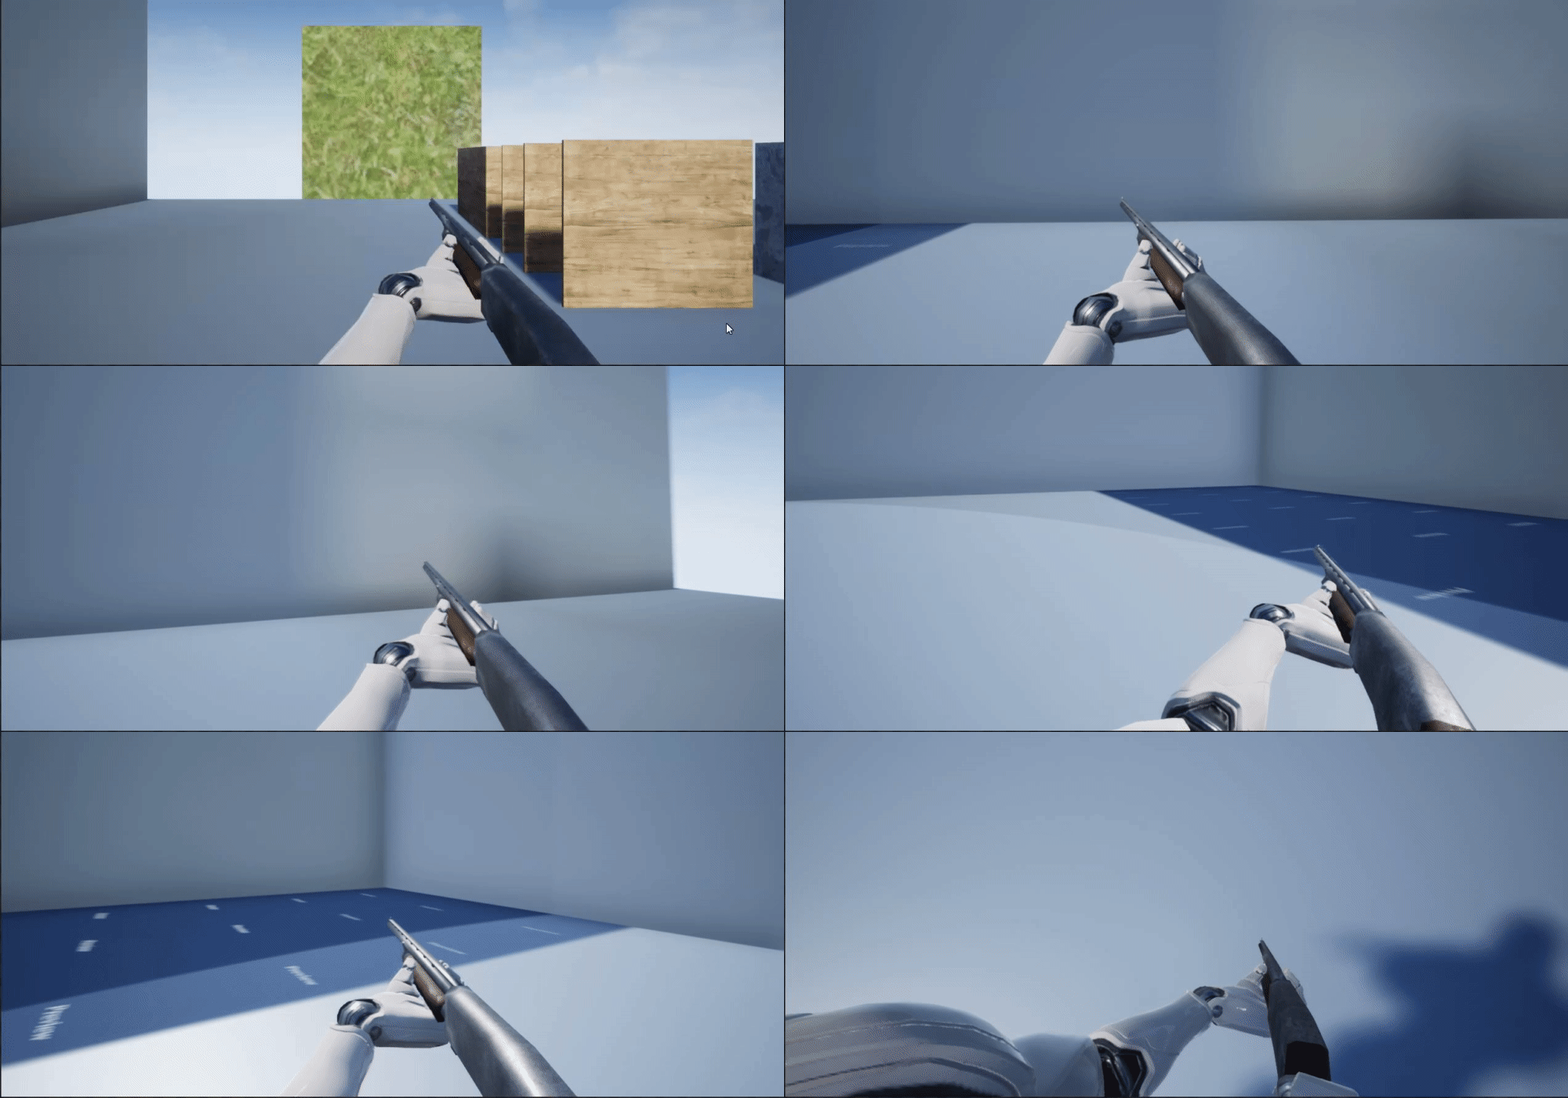
Before diving into how to achieve these results, I’ll first go over the concept of Inverse Kinematics as it applies for hand placement and the usage of procedural animations, as well as the concept behind a “deadzone aim” with examples.
Basics of Inverse Kinematics
When using characters with a skeletal transform hierarchy of bones, there are two types of rotational kinematics than can affect the rotation of a bone chain: forward kinematics and inverse kinematics. Forward kinematics are simply the direct rotational data from the transform of a skeletal mesh’s bones. For example, if you open up the Unreal Persona editor and rotate a character’s shoulder bone, you should see the other arm bones in the chain rotate with it.
Inverse Kinematics, on the other hand, do the same thing but in the opposite direction down the chain. The last bone of the chain is assigned a target transform called the “effector” or “end effector”. As the effector is moved around in space, the end of the bone chain will attempt to reach the effector’s location, with the IK solving algorithim rotating the rest of the bones in the chain so they can reach the effector. Take an arm for example; if we designate the hand as the end bone in the chain and the shoulder as the starting bone in the chain, the arm and shoulder will rotate towards the effector as it’s location is moved around in space. If you’d like to read more about IK in Unreal, here’s a link to Epic’s official documentation on the subject that includes some nice diagrams for visual reference.
We can use the location of the end effector to set where the hands and arms of the character mesh are placed relative to where we want them to be seen from a first person view. The effector can either be set manually or using any other transform, which I’ll be doing both of when we jump into the implementation. This system allows us to later interpolate the effector position to different offset locations, resulting in procedural animations on the arms for various poses and actions!
Deadzone Free Aiming, You Ask?
The term “deadzone aiming” refers to an interesting aiming mechanic found in several tactical shooters (namely the Red Orchestra/Rising Storm series and the Insurgency games) which allows the player to offset the position of the weapon and arm models with small mouse movements in order to aim more precisely while minimizing the rotation of the camera. It is also commonly referred to as “free aim” or “offset aim”, and is a very subjective feature. Many players (myself being one of them) enjoy this mechanic due to its immersion and gameplay benefits while other players prefer the traditional method of aiming towards the center of the screen. This mechanic is more on the experimental side for my game, as I thought it would be a cool challenge to implement it. If you’re not interested in this system or don’t need it or like it, feel free to skip to the IK implementation steps!
To break this mechanic down to figure out how it works, we’ll observe the reference to the right from the game Red Orchestra 2. We can see that as the player moves the mouse around, the weapon does not point to the center of the screen, but rather appears to rotate faster than the camera within a clamped radius on both the horizontal and vertical axes. This provides more accuracy when aiming within a specific camera viewpoint, which is useful if a player is watching a specific position for example. There is also a small “tilt” effect when moving rapidly to give the gun a sense of weight.
When the player fires the weapon, we see the bullet impact relative to where the barrel of the gun was pointing instead of the center of the screen, meaning the projectile/raycast originates from the barrel of the gun mesh. We also see the same deadzone effect applied when aiming down the sights to provide the same range of aiming freedom in both aiming modes.
Based on this observation, we can conclude that the system operates using code similar to this psuedo code:
- Set a rotational value for both the X and Y axis to store the sum of itself plus the product of the current mouse axis input and a damping factor.
- Clamp these values between a min and a max.
- Make a rotator variable to store the X and Y values
- Apply the rotator value to the relative rotation of a “pivot component” (any component with a world transform) using a lerp from its current rotation to the rotator’s rotation at a smoothed speed.
- Create a final rotation variable to be used in the anim graph and set it equal to the relative rotation of the pivot component.
- Create an angle rotation to tilt the arms around when rotating to further smooth out the rotations.
You may be able to do this without a pivot component, as the only thing it affects is the initial rotation to lerp from, but its working well for me at the moment. Try experimenting using initial values instead of a component!
Now that I’ve gone over the concepts, I’ll explain how to go about creating these features in Unreal!
IK Step 1: Mesh Sockets
Before we write any code and set up the IK nodes for the left and right hands, its vital that we create some sockets for the IK effector targets and transforms to point to. Now is also a great time to setup a socket for holding your weapon mesh if you haven’t done so already!
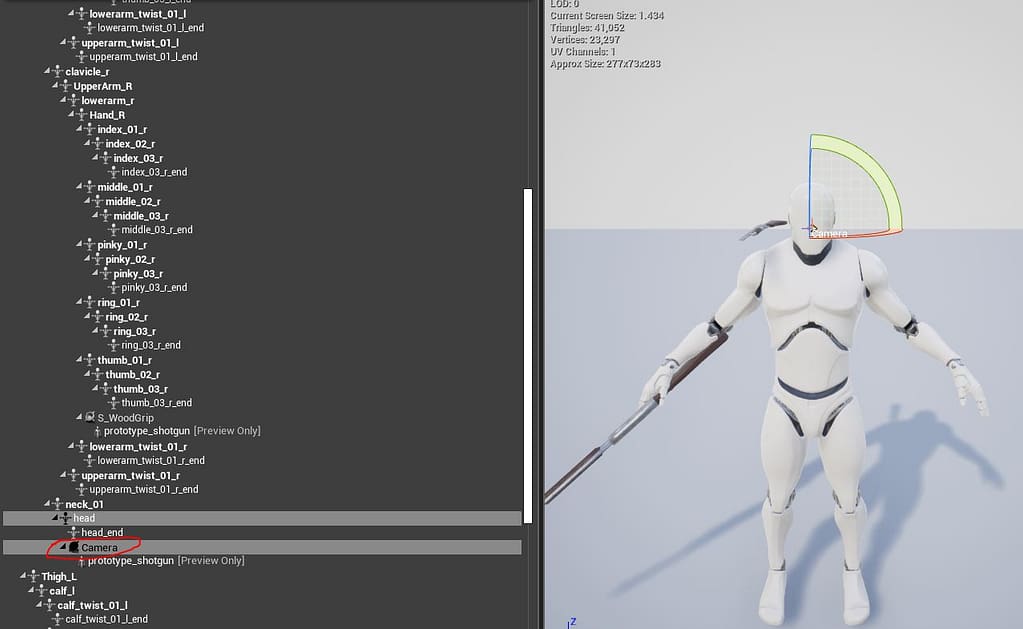
For the right hand, we want the effector target to always be relative of the camera position so the hand and the weapon stay relative to any movements and rotations of the camera. To this end, we need a socket on the head bone of our character mesh called “Camera”. Simply create the socket and adjust its transform. You will need to tweak this later to get the right hand facing the right direction
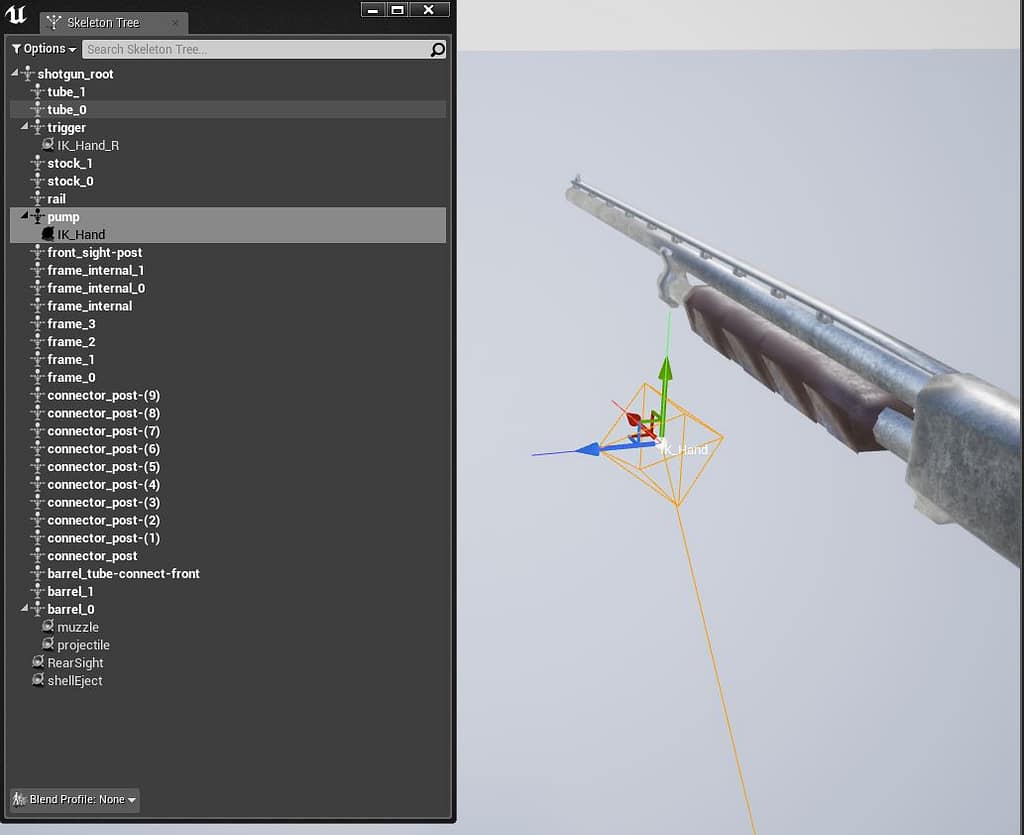
The left hand will be a little bit different. We’re going to use a socket on the weapon mesh named “IK_Hand” to keep the left hand positioned relative to the desired location on the gun. This could be the handguard, foregrip, or action depending on your weapon. In my case I’ve placed this on the pump action of my shotgun model. Make sure any weapon you use has this same socket!
IK Step 2: Right Hand FABRIK Node
Now we need to setup the individual IK nodes for both of the hands. We’re going to be using the FABRIK node for the hand IK in our animation blueprint’s anim graph. Since the location of the hand differs depending on the socket used for their end effector target, each hand will require a different event graph setup to get working properly. At this point, the right hand doesn’t need any sort of event graph setup to work and can be done right in the FABRIK node itself!
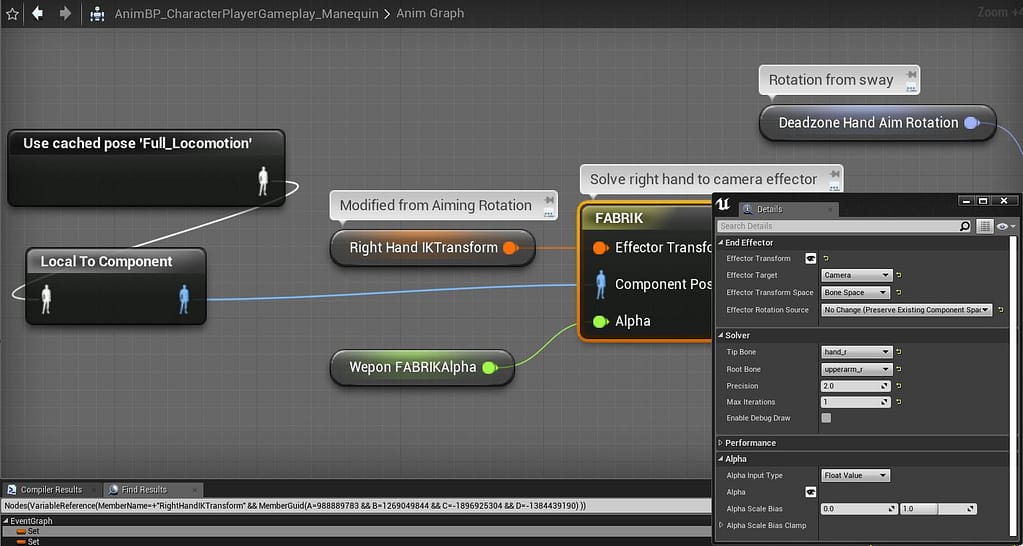
Go ahead and create a FABRIK node off of the Full Locomotion pose made in the last part of the series. We want to set the effector target to our Camera socket we made in the previous step, keeping the transform space in Bone Space and not changing the chain’s rotation relative to the socket. This will let us move the effector transform relative to the Camera socket!
Next we need to set up the bone chain to follow the effector. This node is for the right arm, so we want the tip bone of the chain to be “hand_r” and the root bone to be the shoulder, or “upperarm_r” on this mesh. Keeping the precision and iterations to lower values like 2 and 1 respectively prevent any stuttering if the rotations move too far from the socket. Now you can move the effector transform using the anim blueprint’s viewport to set the right arm’s position! Once you get a value you like, promote the transform to a variable for later. Also promote the Alpha to a variable and init it to 1. If you ever need to turn off IK, change this value to 0.
Here’s what the node’s details should look like:
Now if you run the game, you’ll be able to see your right arm in the effector position you setup! However, you’ll notice that your left arm is still in the original position from the aim offset pose.
IK Step 3: Left Hand Events and FABRIK
The left hand requires a bit more setup to get working properly, including some conversions in the event graph. We’re going to take the IK_Hand socket from our weapon and convert its world space transform into the local bone space transform of the right hand bone. This will allow the left hand to move relative to the IK_Hand socket’s movements (which is needed for the pumping animation we’ll be making later in the series) while simultaneously keeping it in sync with the right hand’s position, effectively achieving the proper aiming stance once the effector location is set.
Open the anim blueprint event graph and add the following code for the transform space conversion. This should be before the root yaw offset code from the previous part:
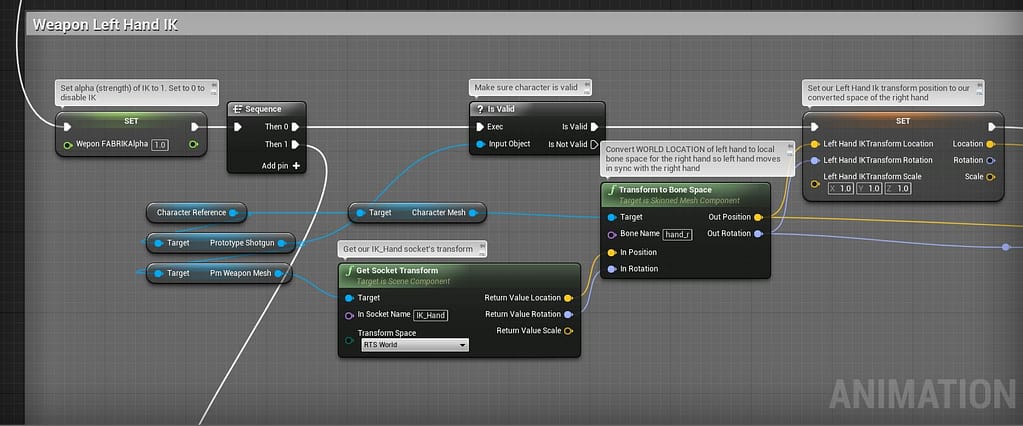
Now we can setup the FABRIK for the left hand using the converted location and rotation from the event graph! This is done in the same fashion as the right hand, except we want to use a different effector target socket and different bones for the solver chain.
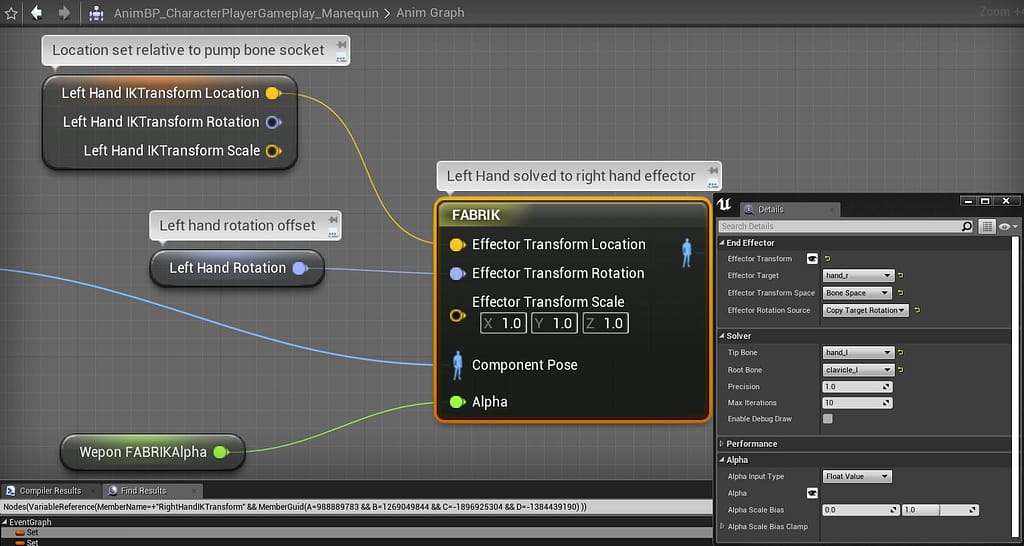
Set the effector target bone to the right hand in bone space. This will allow the conversion from earlier to work properly. For the left hand, we want to use Copy Target Rotation so the hand is rotated in the correct position relative to the right hand’s rotation. You may have to offset this using a rotator variable in order to get the hand to hold the gun correctly. Use the left hand as the tip bone and either the left clavicle or left uppearm as the root bone. Finally, go ahead and connect the transform location value from earlier into the effector transform location as well as any rotation offset you may need to get the hand facing the right way.
Here’s what your details panel should look like for the left hand FABRIK
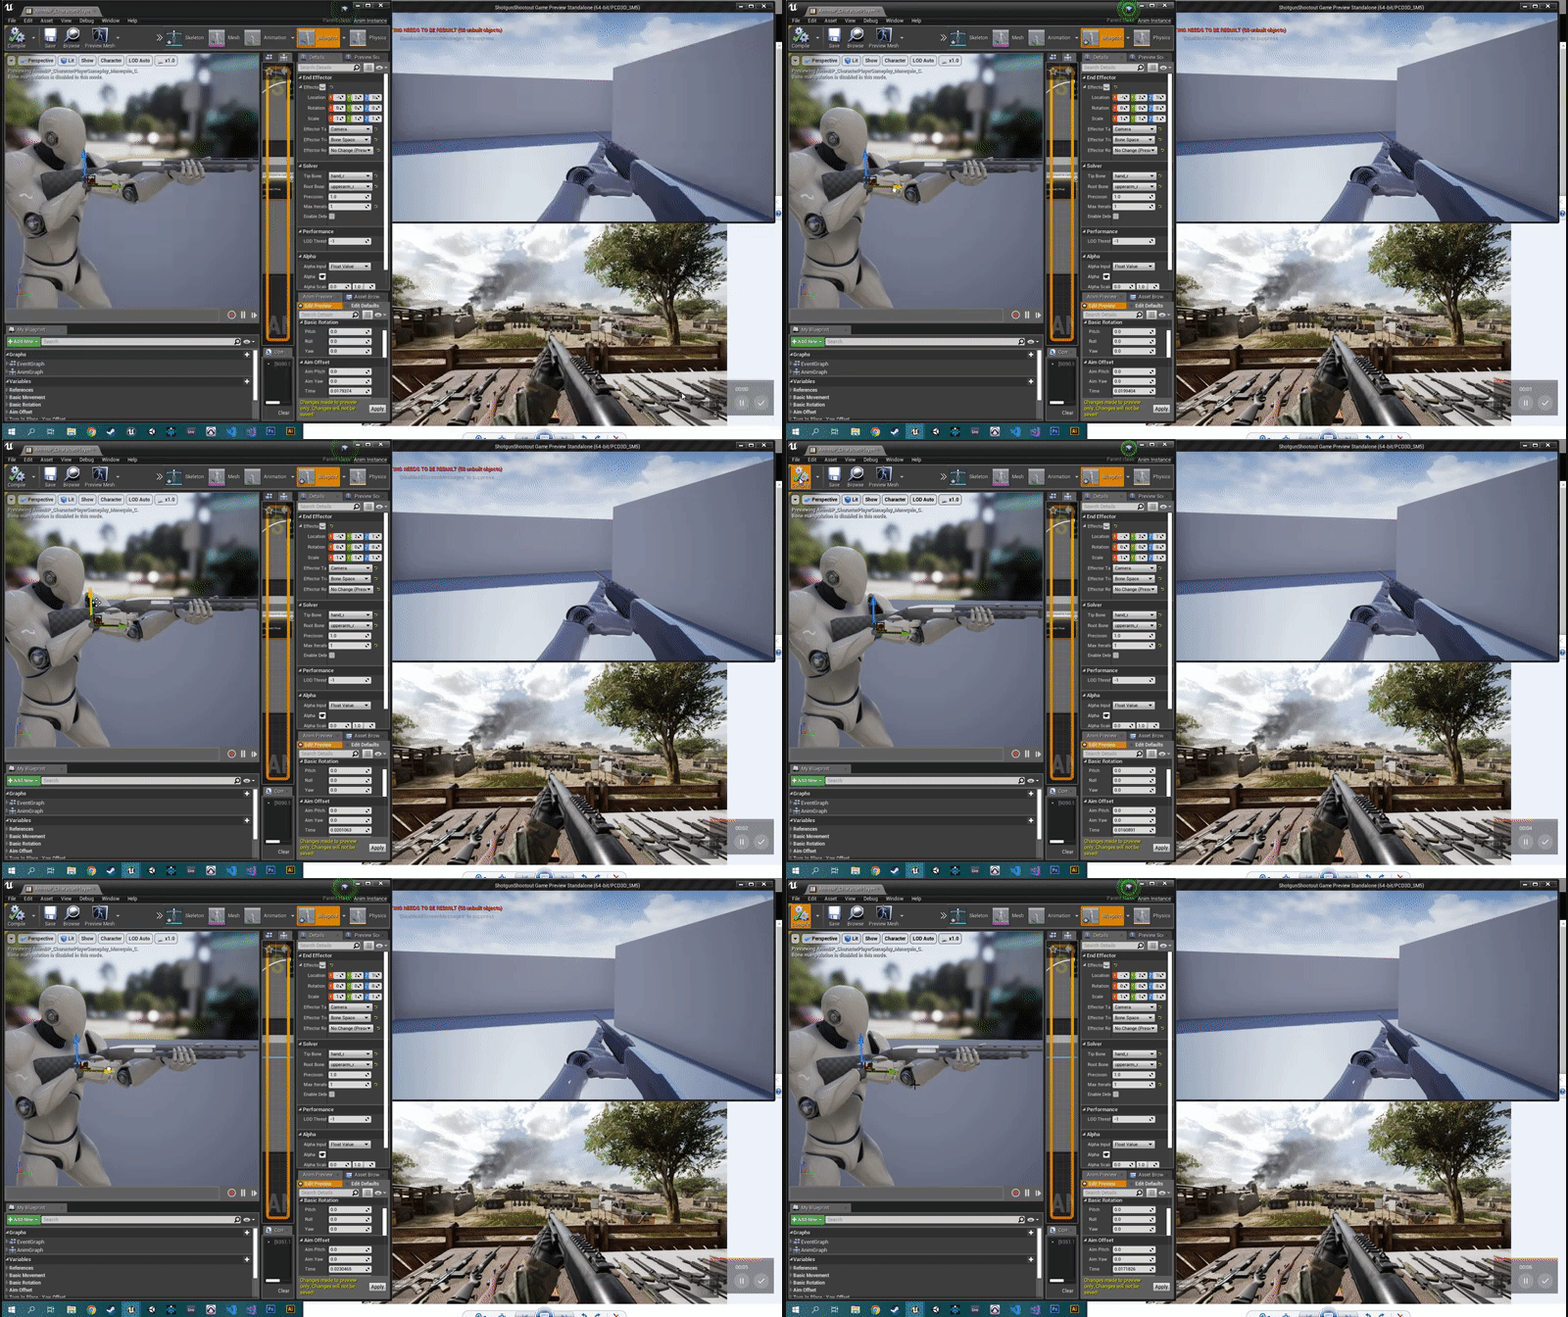
Now you need to position the left hand efector in the desired location and set that value as the default for the LeftHandIKTransform’s location value. The best way to do this is with the game running in a different window so you can see the changes reflected in the converted bone space.
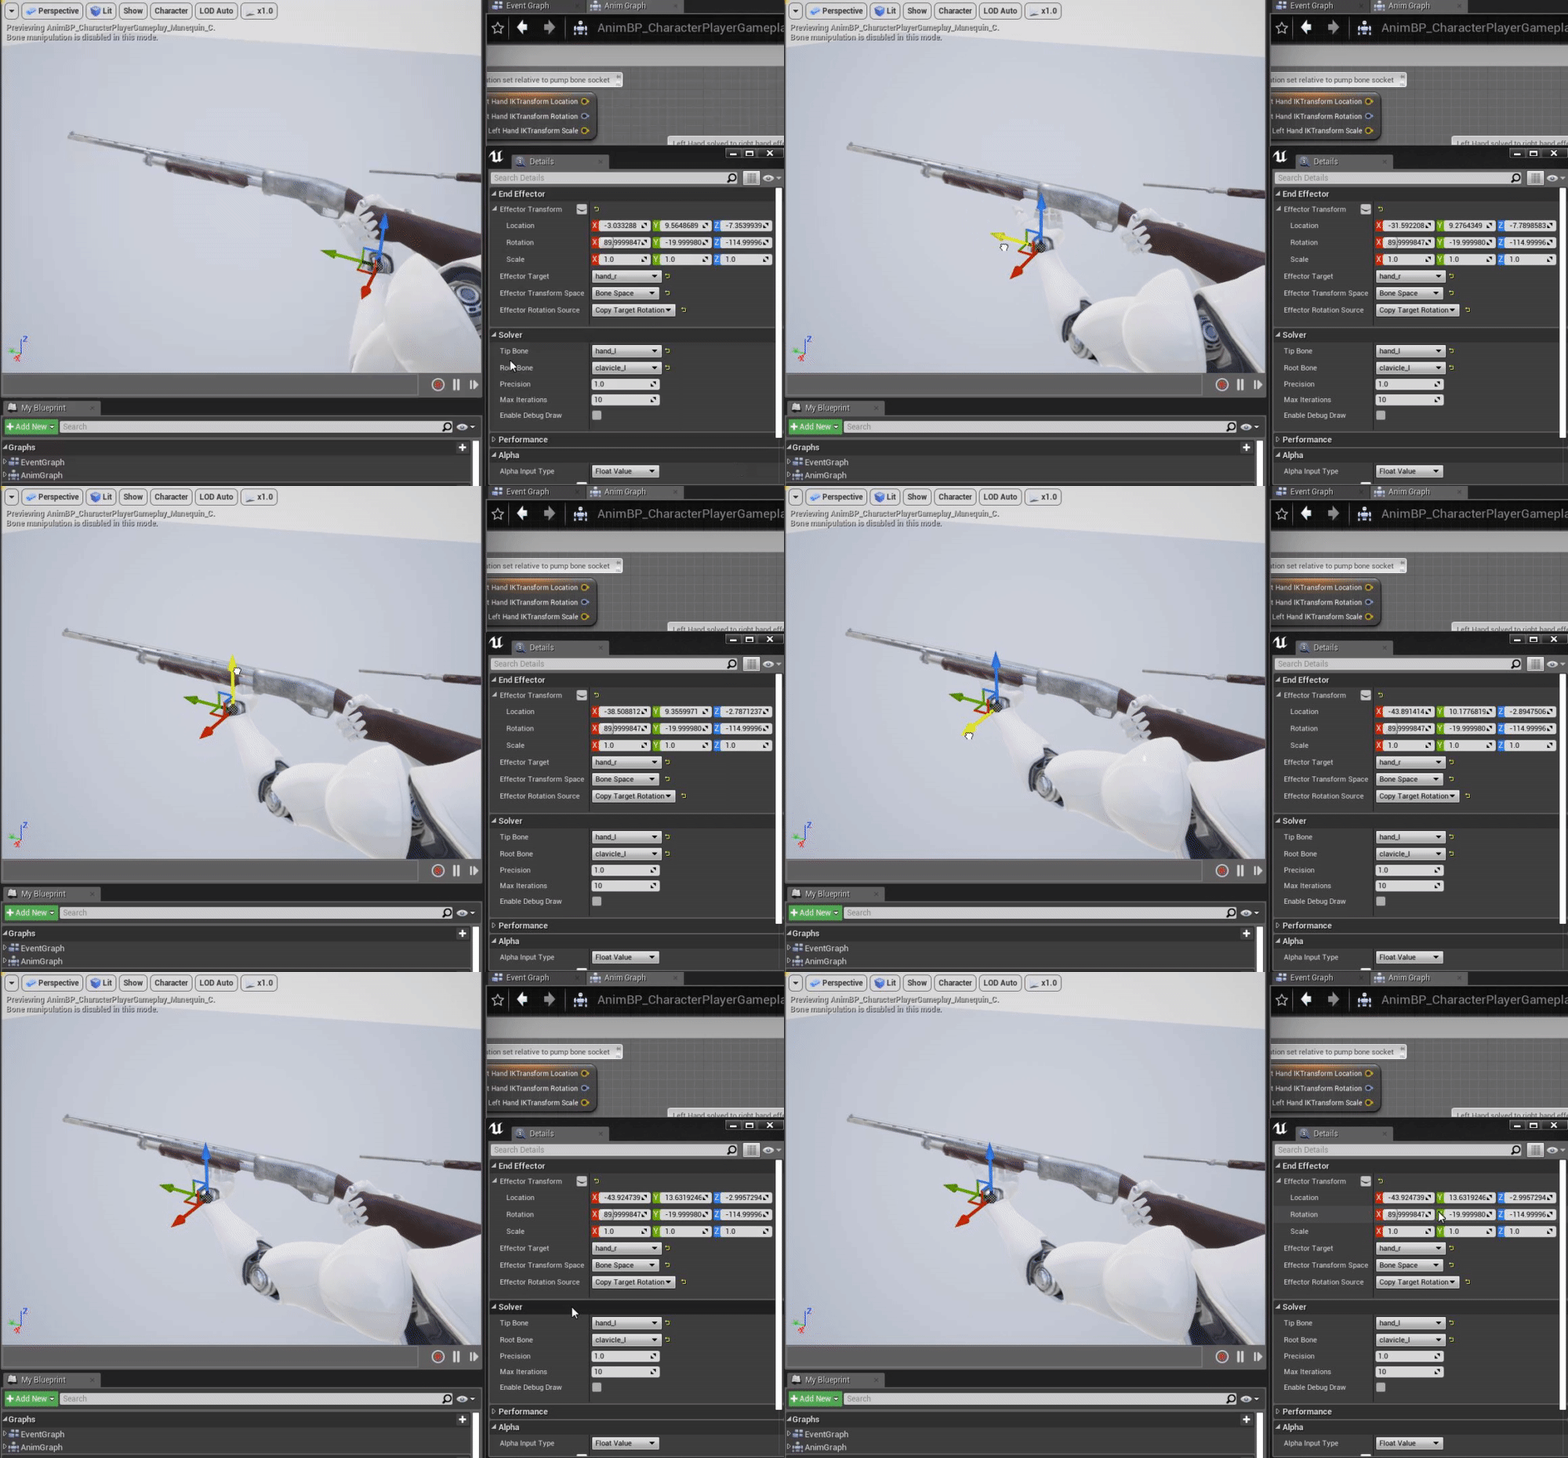
That’s it for the Hand IK setup! Now you can go ahead and position the right hand and left hand effectors in any pose! Wherever you move the right hand, the left hand will move relative to it. I recommend finding a reference pose from another game or from real life and referring back to it with the game running to position the arms.
Free Aim Deadzone Step 1: Rotation Calculation
Creating the deadzone free aiming system is quite simplistic now that we have our psuedo code from earlier. We just need an efficient way to write out the calculations for the offset rotation variables and send the data to the anim graph to affect the rotation of the right hand, which will automatically rotate both of the arms. I chose to write this code in C++ as I prefer to write mathematical calculations with normal code opposed to blueprint, but you can definitely achieve the same result with blueprint as well!
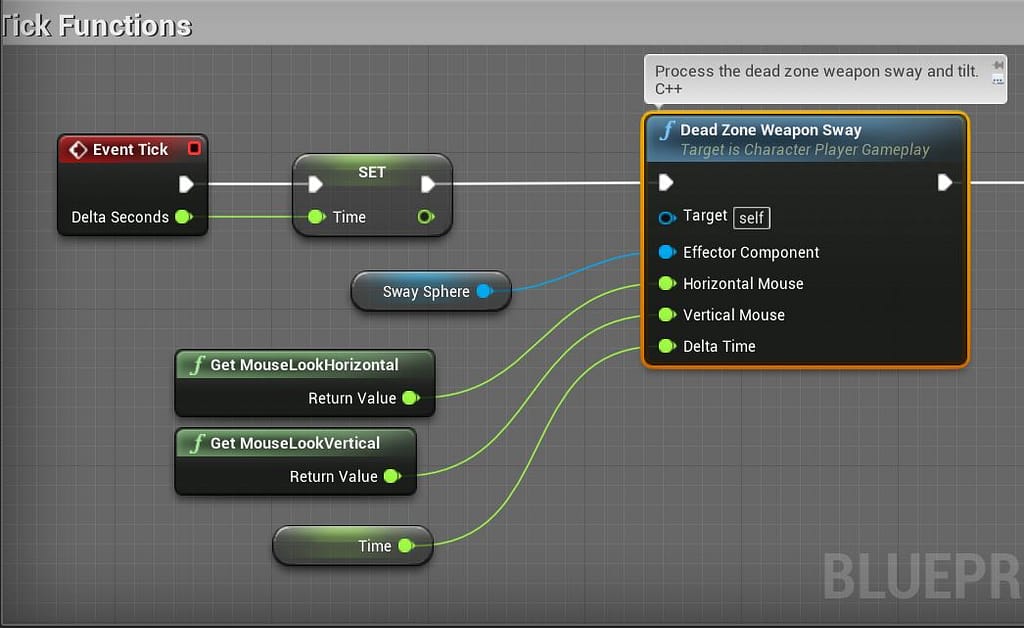
First, create a new C++ function in your Character Class made in the last part of the series and name it something like “Aim Deadzone”. I’ve named mine “Dead Zone Weapon Sway” as I was calling it weapon sway when I was originally trying to achieve the Call of Duty style effect. Make this function accessible to the Character blueprint and give it four parameters.
- Effector component of the type of your choosing (mine is a USceneComponent*)
- float horizontalMouse
- float verticalMouse
- float deltaTime
Call the function from your blueprint’s tick event and hook up the parameters like so:
Now we need to use the following variables to implement the calculation from the psudeo code, which I’ll go ahead and put here again for reference:
- Set a rotational value for both the X and Y axis to store the sum of itself plus the product of the current mouse axes input and a damping factor.
- float Rot X and Rot Y
- float StartSensitivity is the damping factor
- Clamp these values between a min and a max.
- floats MinRotX/Y and MaxRotX/Y
- Make a rotator variable to store the X and Y values
- FRotator DeadzoneTargetRot
- Apply the rotator value to the relative rotation of a “pivot component” (anything with a world transform) using a lerp from its current rotation to the rotators rotation at a smoothed speed.
- Create a final rotation variable to be used in the anim graph and set it equal to the relative rotation of the pivot component.
- Create an angle to tilt the arms around when rotating to further smooth out the rotations
- float TiltingAngle to tilt the arms around
- floats TiltAroundX/Y/Z to add mouse axes inputs to the tilting angle. I’m only using X and Z for my implementation, but the tilt axis may differ depending on your needs.
The default values shown in the images below should be good starting points when tweaking.
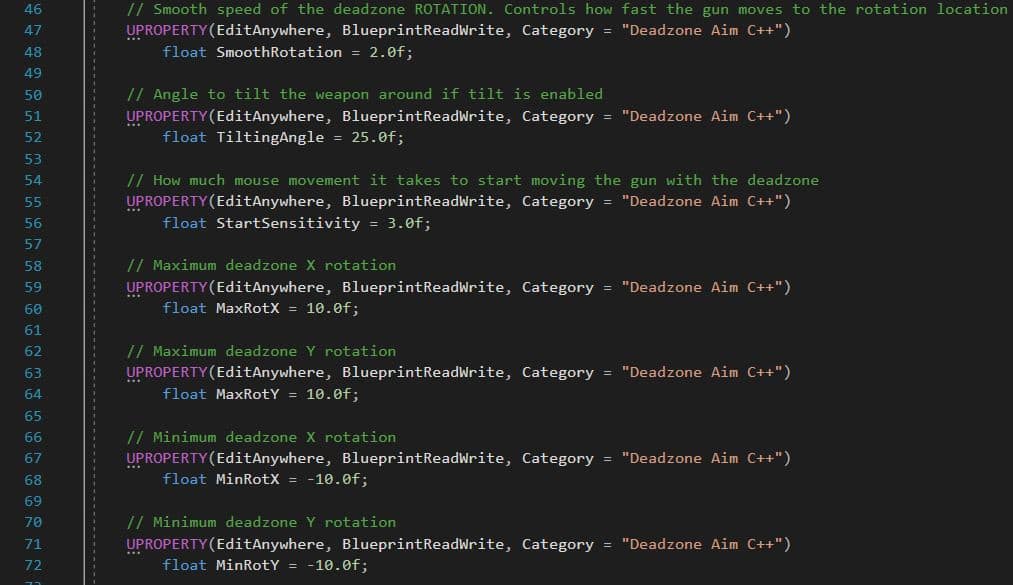
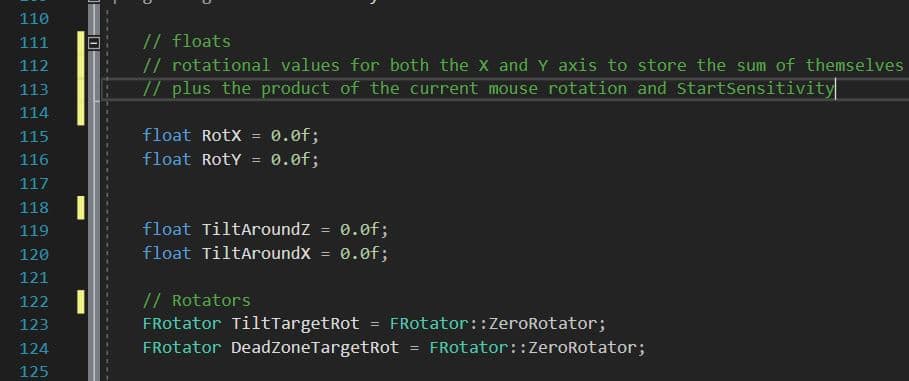
Its also a good idea to create a few boolean variables for turning the Deadzone and tilting on or off in case you want to make them settings options or turn them off when aiming down the sights.

Once you have all the variables, its time to implement the function. We want to check if the EnableDeadzoneX/Y boolean variables are true in individual if statements. In each branch, first check if the horizonal/vertical mouse value has exceeded 1 or -1. If it has, set it back to 1. This is to prevent the mouse values from getting too large, as Unreal does not use normalized mouse input by default.
After this, set the RotX/Y to equal itself plus the respective mouse value multiplied by StartSensitivity. Now whenever the mouse is moved, the Rot value will increasingly move itself in the same direction as the mouse and remain stationary when mouse input stops. The sensitivity determines how quickly the rotation is achieved.
Now make DeadzoneTargetRot into a new rotator with the RotX and RotY values. I had to use RotY as the X value and RotX as the Y value due to the way my axes are setup with the gun, so this may differ for you. Convert DeadzoneTargetRot into euler angles so we can use it as a quaternion, which will increase the fidelity of the rotations and give access to the Slerp function we need for applying the values to the effector component.
Next simply clamp the RotX/Y by the Min/Max values for each axis. Once this is done for both X and Y, we need to apply the DeadzoneTargetRotation to our effector component’s relative rotation. To do this smoothly, we use the FQuat::Slerp() function using SmoothRotation times the change in time as a damping value. Lastly, set the FinalDeadzoneAimRotation value equal to the relative rotation of the effector component so we can use this variable in the anim graph.
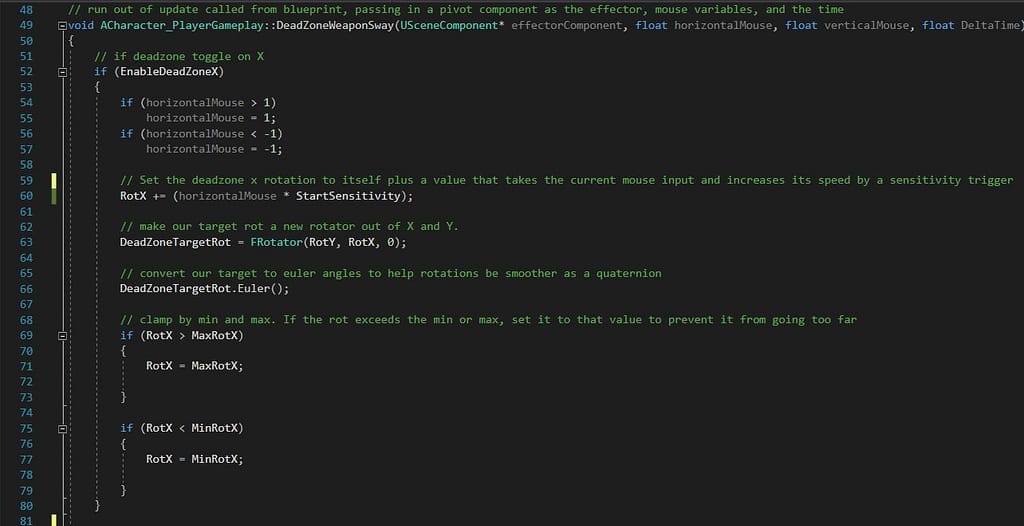
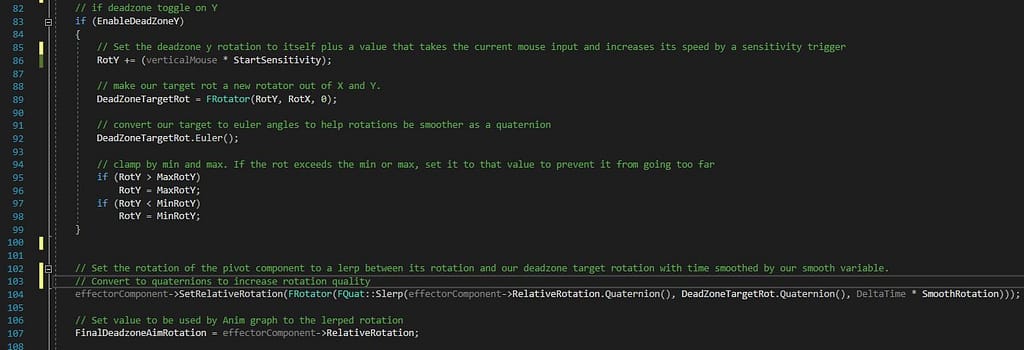
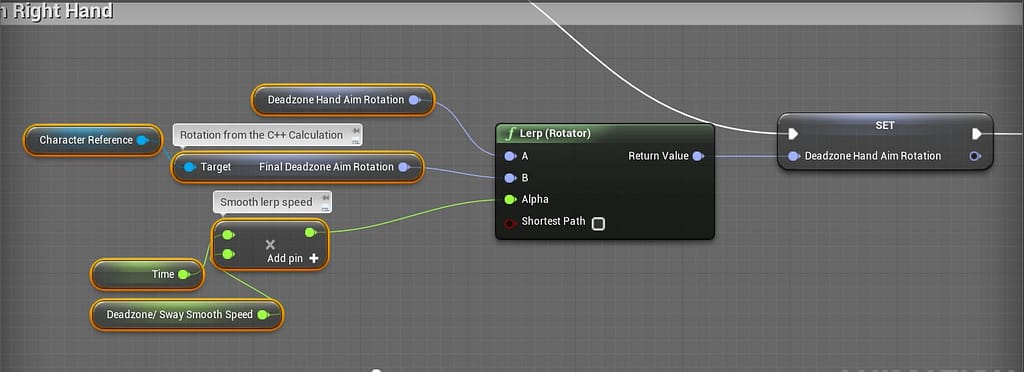
That does it for the deadzone part of the calculation! Lets hook up the FinalDeadzoneAimRotation variable to our right hand rotation in the anim blueprint so we can test it. First go to the event graph and grab a reference to the Character blueprint so we can get the FinalDeadzoneAimRotation variable. Next, add a Lerp(Rotator) node and hook up FinalDeadzoneAimRotation as the B rotator. Create a new variable in the anim blueprint called DeadzoneHandAimRotation to store the current value of the hand’s rotation and hook it up to the A rotator of the lerp. Use the change in time multiplied by a damping factor as the alpha, then set DeadzoneHandAimRotation to the resulting lerped rotator.
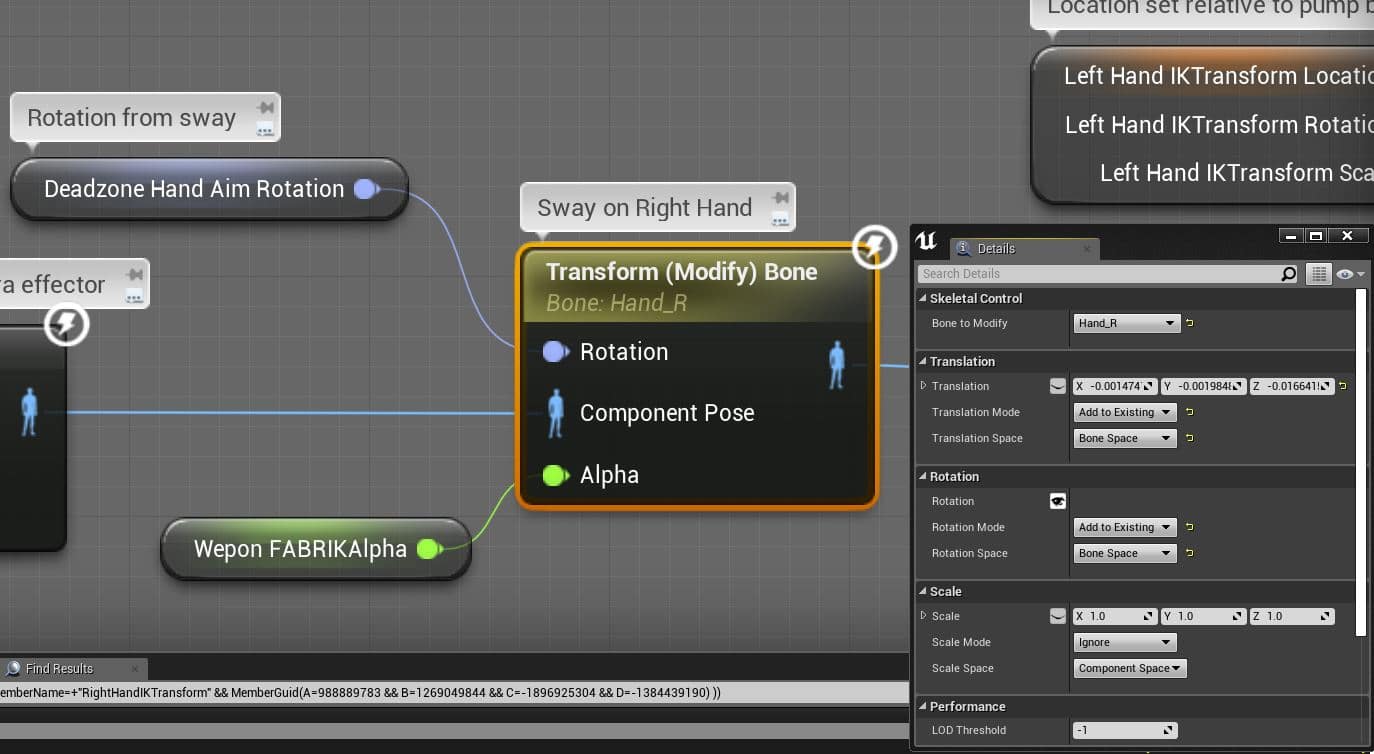
Head back to the anim graph and go to the right hand FABRIK node. Add the following Transform Modify Bone node and hook up its rotation to the DeadzoneHandAimRotation value we just created. This will rotate the hand according to the values from the C++ code on top of the hand IK!
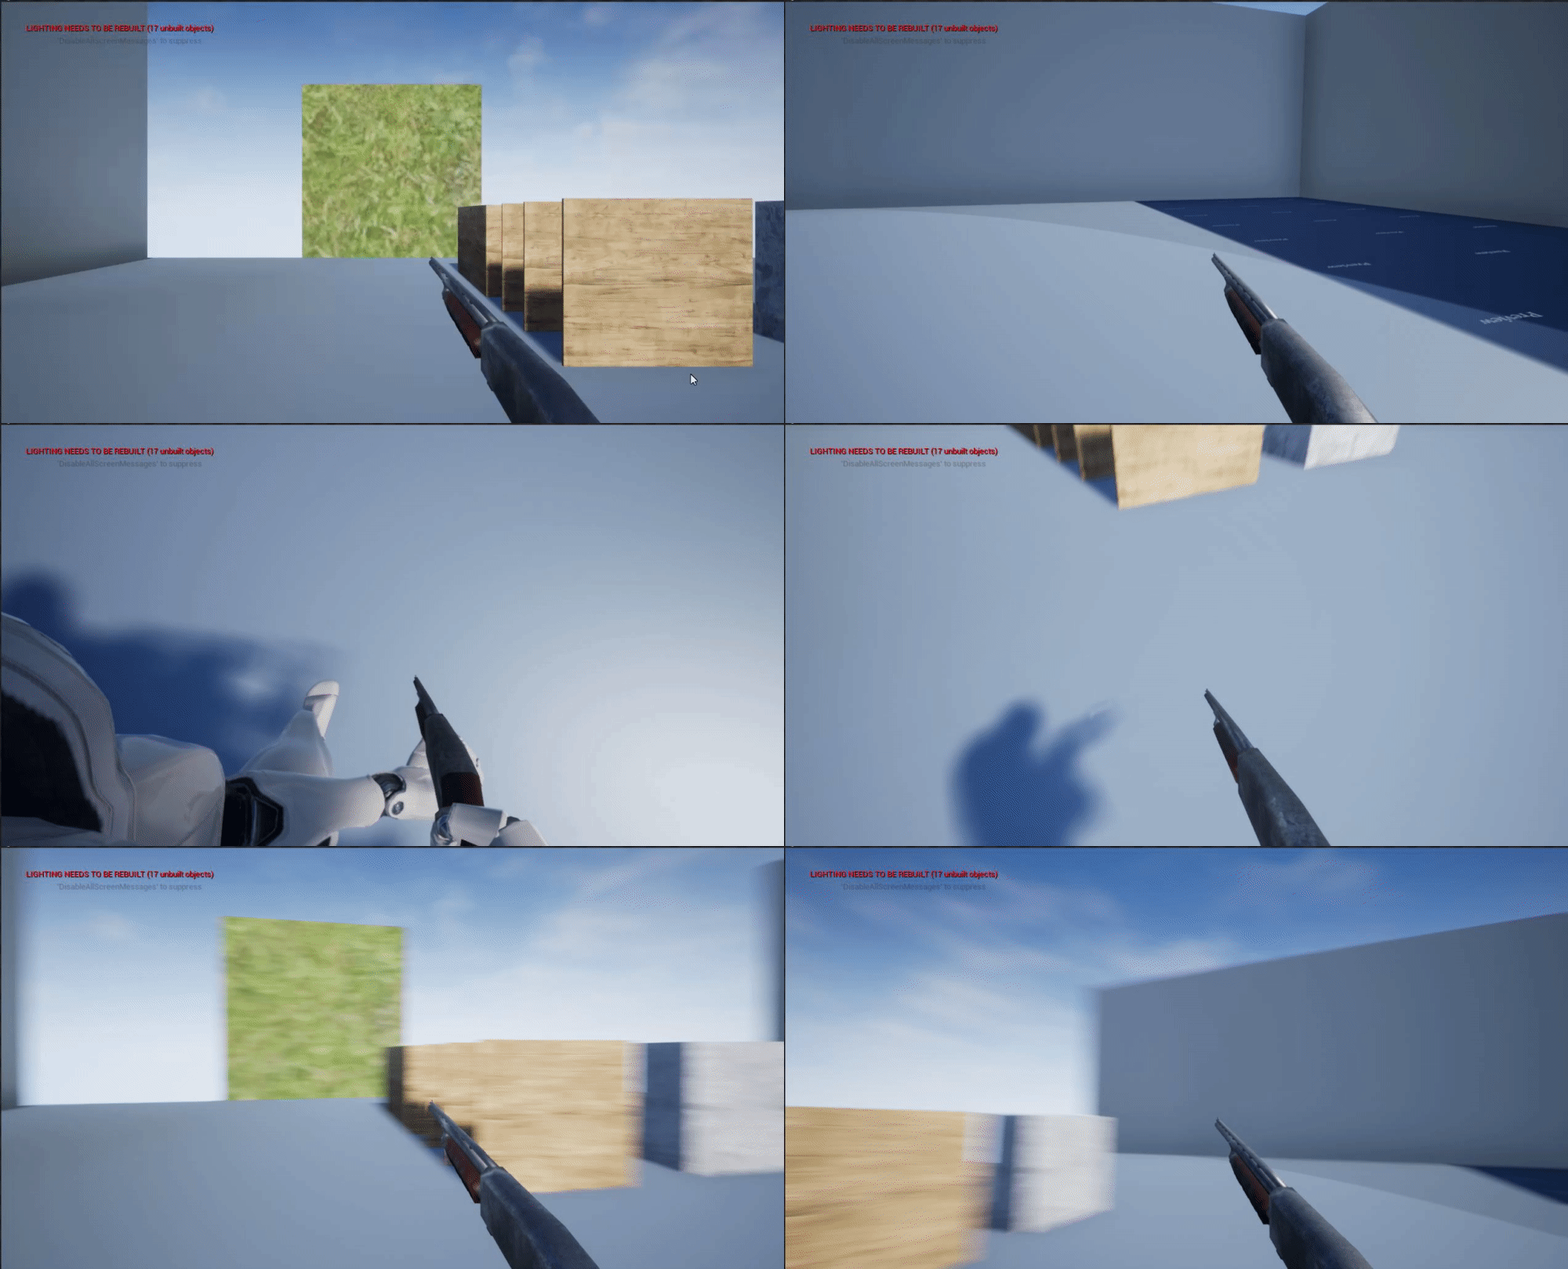
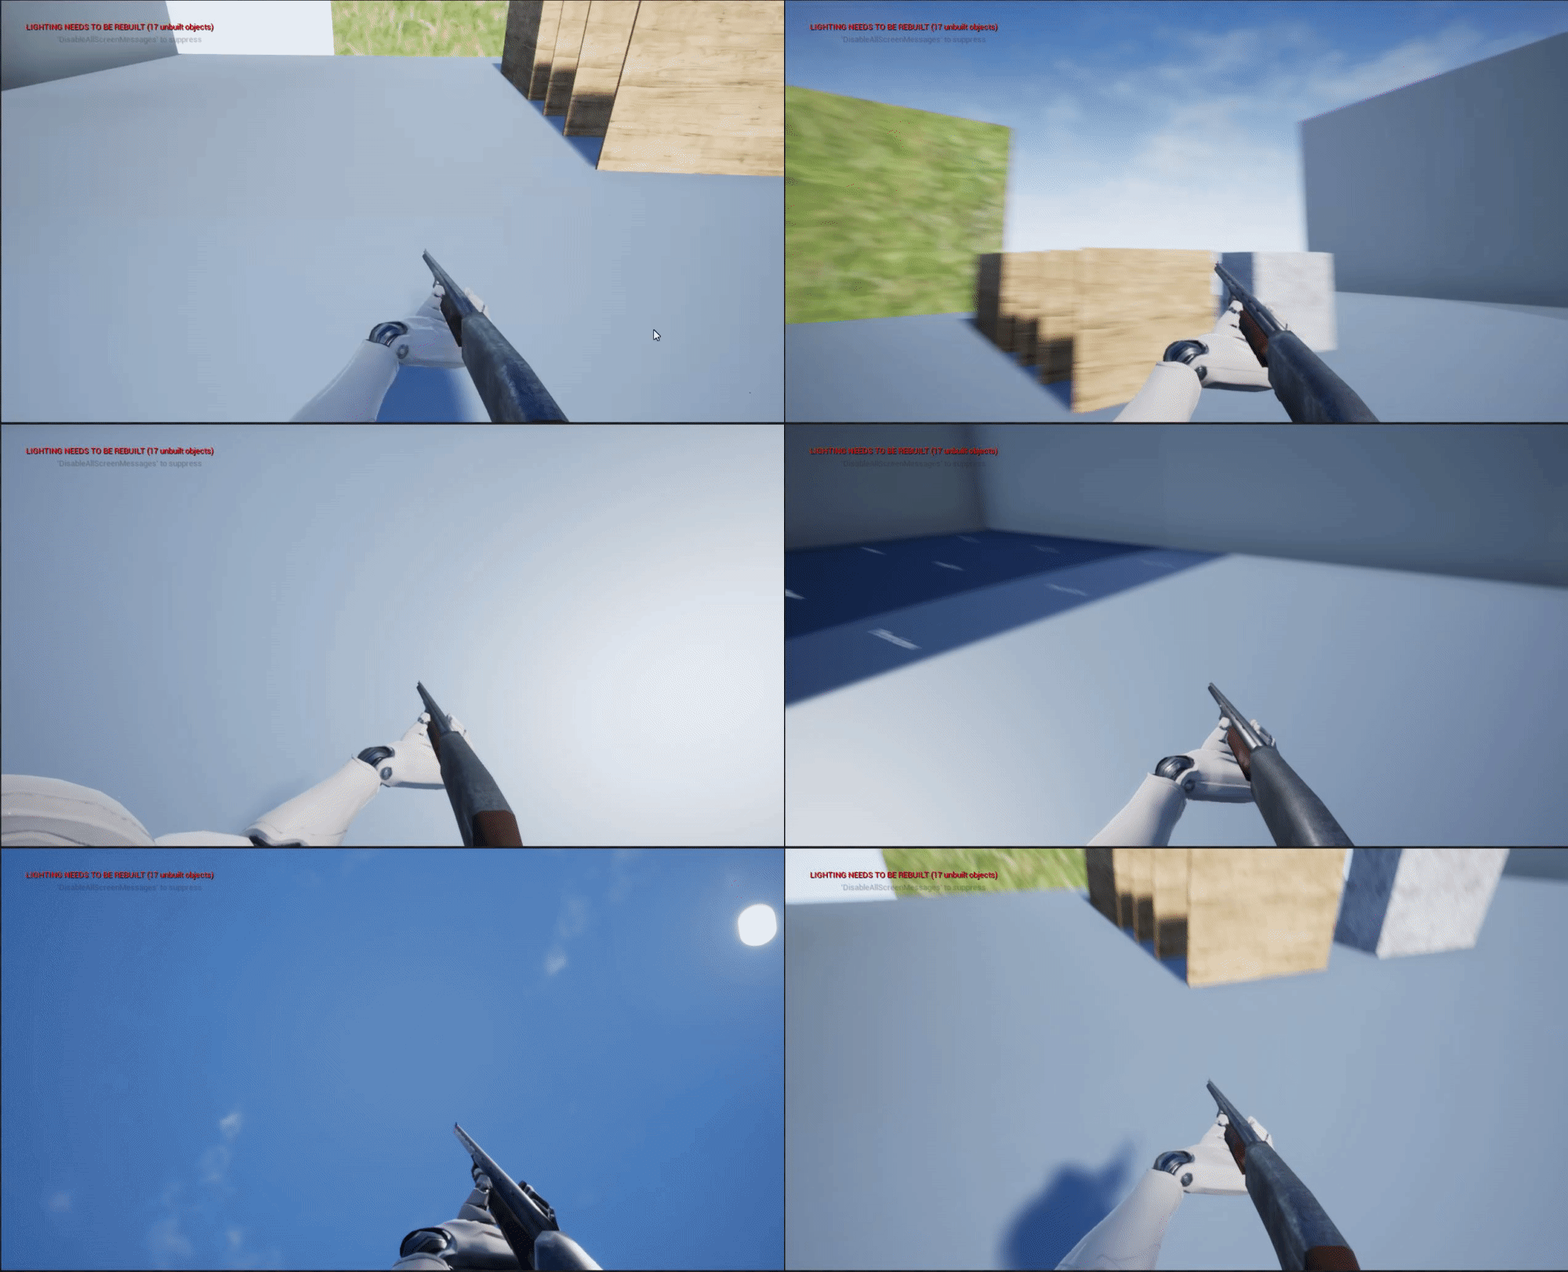
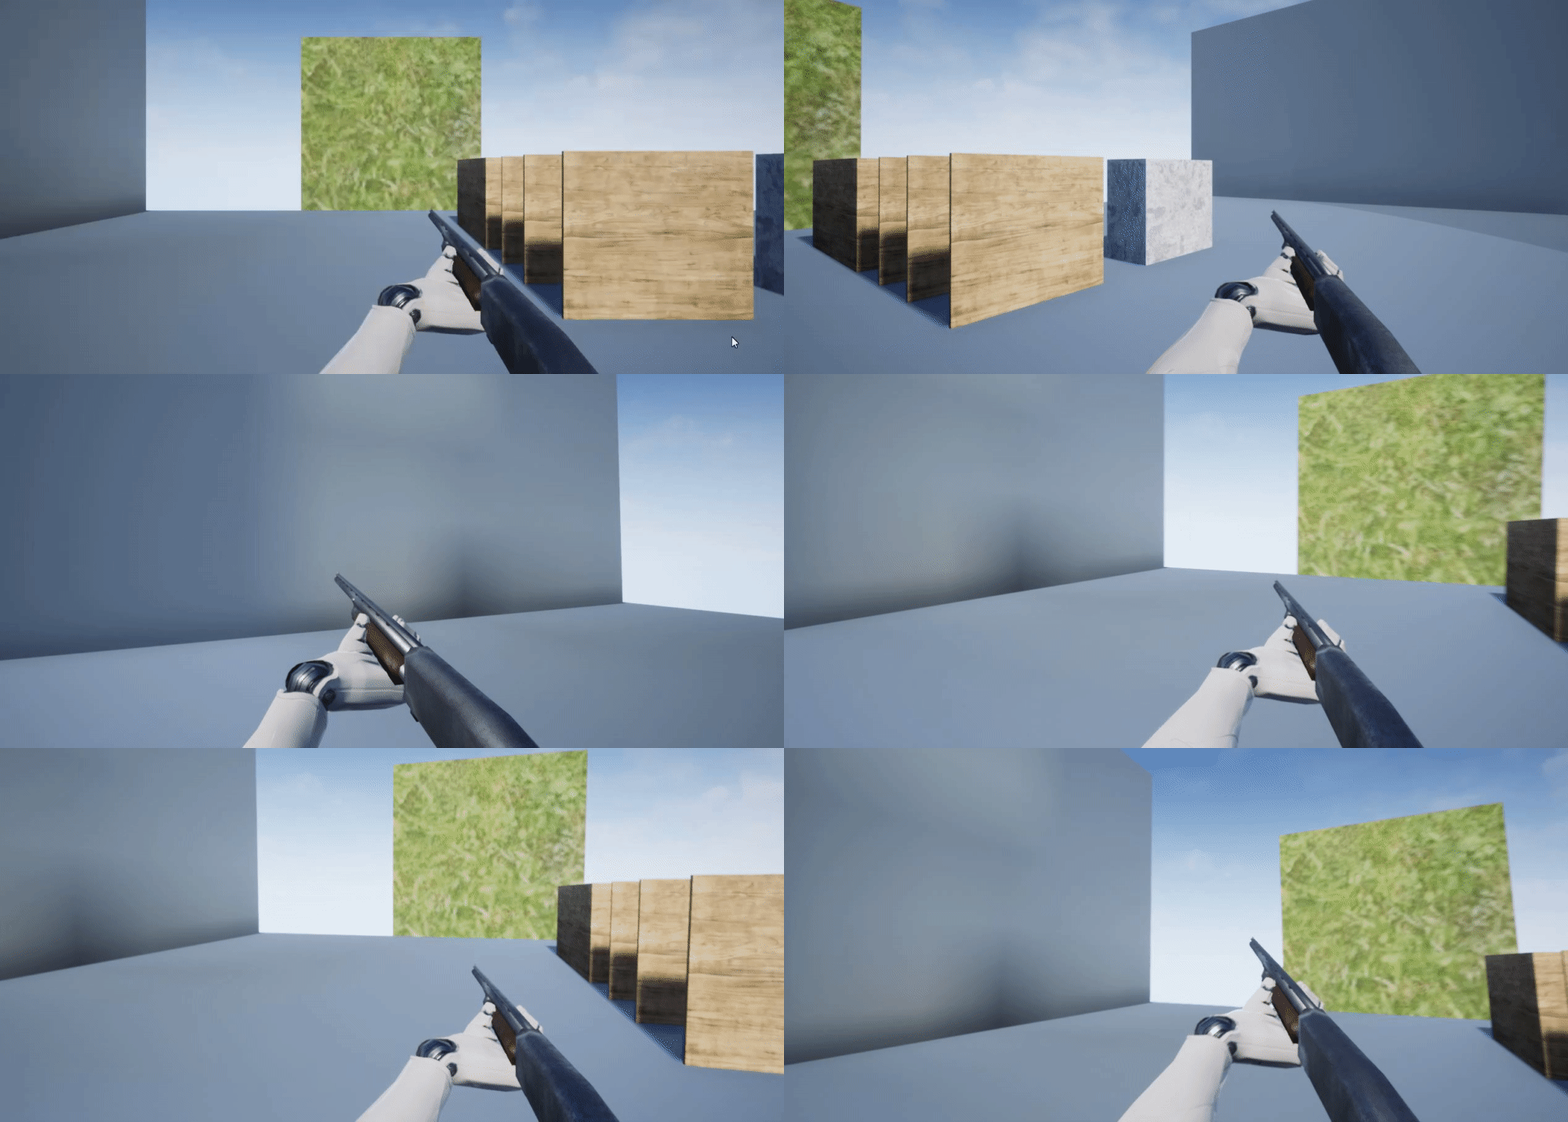
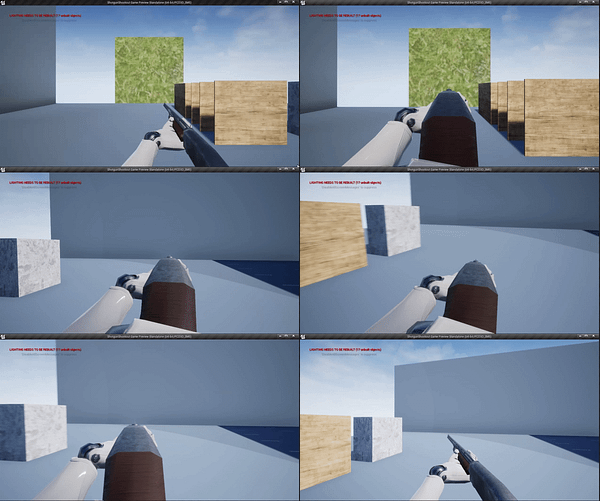
Here’s the result of using the deadzone code after tweaking the parameters to my preferences. Its working as intended, but as you can see, it looks very floaty, making the gun feel rather weightless. We still need to still need to add the tilting effect, which once added will make the rotation snappier!
Free Aim Deadzone Step 2: Anim Blueprint
That does it for the deadzone part of the calculation! Lets hook up the FinalDeadzoneAimRotation variable to our right hand rotation in the anim graph so we can test it. First go to the event graph and grab a reference to the Character blueprint so we can get the FinalDeadzoneAimRotation variable. Next, add a Lerp(Rotator) node and hook up FinalDeadzoneAimRotation as the B rotator. Create a new variable in the anim blueprint called DeadzoneHandAimRotation to store the current value of the hand’s rotation and hook it up to the A rotator of the lerp. Use the change in time multiplied by a damping factor as the alpha, then DeadzoneHandAimRotation to the resulting lerped rotator.

Head back to the anim graph and go to the right hand FABRIK node. Add the following Transform Modify Bone node and hook up its rotation to the DeadzoneHandAimRotation value we just created. This will rotate the hand according to the values from the C++ code on top of the hand IK!

Here’s the result of using the deadzone code after tweaking the parameters to my preferences. Its working as intended, but as you can see, it looks very floaty, making the gun feel rather weightless. We still need to still need to add the tilting effect, which once added will make the rotation snappier!

Free Aim Deadzone Step 3: Tilt
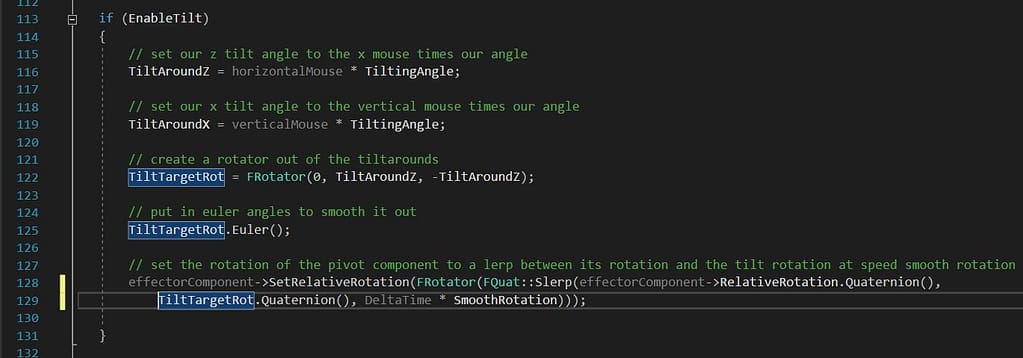
To create the tilting effect, head back to the C++ deadzone function and add the following branch after the rotation code is set. All we’re doing is using a tilt angle value (set to 25 degrees by default) multiplied by the horizontal/vertical mouse input values, making them a rotator, converting to euler angles, and performing a Slerp on the EffectorComponent’s relative rotation the same way we did with the deadzone rotation. When setting the TiltTargetRotation, you’ll have to experiment with which angles you want to tilt around which axes depending on how your weapon model’s rotation vectors are setup. You may only need one axis to tilt around. For my implementation, using Z for the Y value and the opposite of Z on the Z value worked nicely!
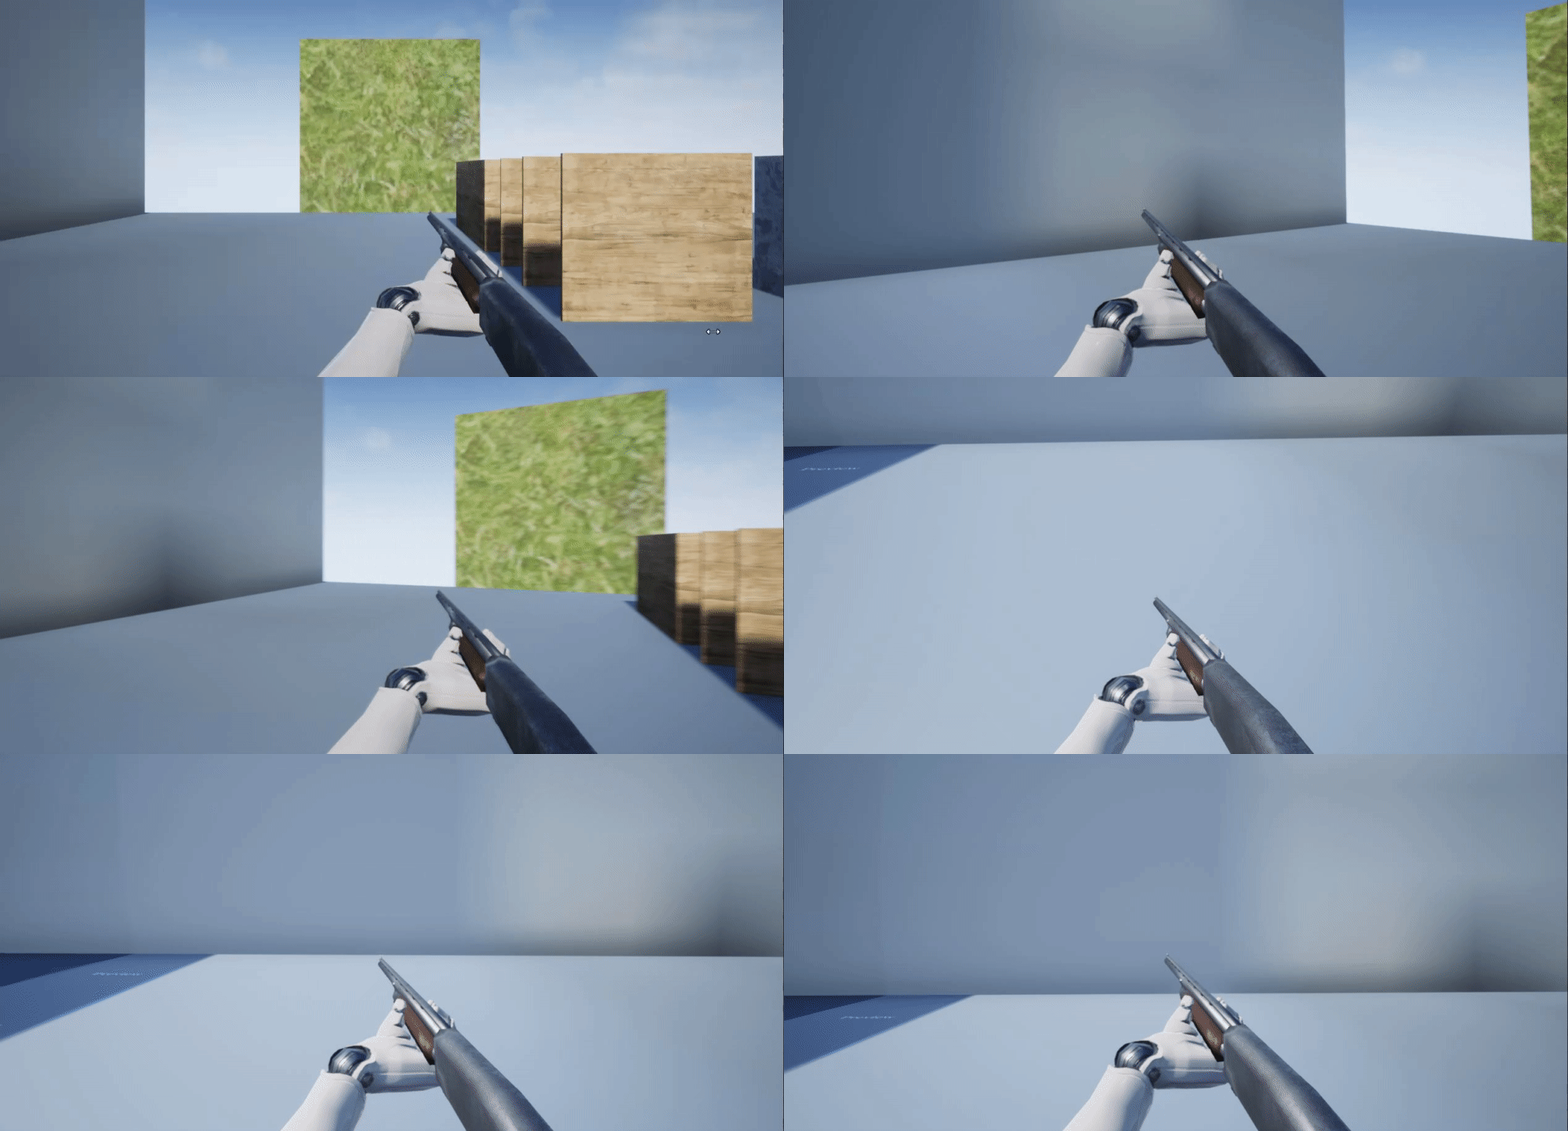
Run the game now and see the difference: the deadzone should feel much much smoother and gives the gun a sense of weight when moving it around! You’ll need to tweak all of the values to your liking, possibly even making them settings for players to tweak in game!
Next In Store: Aiming Down Sights!
I hope you found this part of the series informative, useful, and/or interesting! I’d love to hear your feedback in the comments down below and see what projects you’re working on if you’re following along! Next time we’ll be adding an aim down sight procedrual animation with our new Hand IK setup as well as the proper ADS camera setup when switching between the two animation states!
See you next time,
– Karl
Next Part: Aiming Down Sights With Procedural Animation:…and Math!


Pingback: Designing an Immersive FPS in Unreal Engine 4! Part 3: Aiming Down Sights with Procedural Animation...and Math! | KARL LEWIS
Geesh
19 Nov 2019How do you make sure that the right hand does not shake sideways while looking up and down and how did you straighten the head of the camera