One of the things I’ve always loved about video games when compared to other creative mediums like film, music, and writing is how they can pull their audience directly into an experience and give them the ability to influence it in some way. Well, maybe not entirely “directly” yet, as the technology to enable games to influence smell, taste, and touch (haptic feedback aside) does not exist…yet! Until then, us game designers are limited to using only sight and sound to create a feeling of “real” presence in a virtual experience, or a sense of immersion.
As an extremely detail oriented game designer, I’ve always strived to design my game experiences with immersion in mind. This past semester of college, I created 3 first person systems prototypes that all focused on creating immersion in several different ways; one focused on using gameplay mechanics and controls to instill immersion, another focused on perspective, and the third focused on interface and visual elements. These systems experiments were an extremely fun challenge for me, and I wanted to take one of them even further this (now past, somehow…time flies) summer!
My goal going into this summer was to dig deep into learning Unreal Engine 4 by remaking one of the systems prototypes I had done in Unity for class the previous semester, as well as laying the foundation for making it into an actual game later on. I picked the first of these systems, in which the player uses mouse movements to pump and manually reload a shotgun, as it had the most potential for really fun game play scenarios. After some initial learning and setup of the project, I was introduced to the idea of a “true first person” character (I’ll explain this below) and procedural animations, and decided to challenge myself to implement these into the remake to contribute even further to immersion.
What started as a simple learning exercise to make fun gameplay turned into a riveting journey into the world of immersive game design and procedural animation. Over the course of this blog series, I’ll be explaining the steps I took to reach the point the project is at now as well as some light tutorial sections for anyone looking to create a similar system. Below is a video of the current features of the project as of Fall 2019. This video will be updated as major features are added.
Without further ado, let’s get into the first part of this series: my intent for the game and immersive character systems as well as the assets and steps needed to setup a true first person character!
Series Index:
- Intent, Setup, & True First Person Character
- Hand IK and Deadzone Rotation
- Aiming Down Sights with Procedural Animation…and Math!
- Firing Projectiles and Controlling the Pump Action
- Procedural Recoil Animations
- Manual Reloading Controls and Procedural Animations
Intent
Inspired by the manual reloading mechanics from Virtual Reality shooter Hot Dogs Horse Shoes & Hand Grenades, the intent of the original Unity systems prototype was to use click and drag mouse movements to manually pump shells in and out of a shotgun in order to create a “kinetic” feeling weapon that felt more like a real object that could be interacted with instead of the traditional shooter route of simply playing animations for manually operated weapon actions. I wanted players to be able to interact with the weapon, which is what they will always be seeing and using in a first person shooter, as much as possible, later adding a manual reloading mechanic with similar mouse inputs to compliment the manual pumping. To achieve immersion, I also placed a strong focus on visual and auditory feedback to give the game as realistic of a feeling as possible given the limitations to senses of sight and sound, with both senses being equally developed to allow immersion and accessibility to not be mutually exclusive. Recoil on the camera and weapon model, screen shake, punchy sound effects, point shooting and aim down sight modes, and weapon camera sway were all added to contribute to immersive game feel.
The intent of the Unreal remake of the gameplay has not changed in anyway from the original prototype, apart from plans to make it into a game of some sort. I’m currently toying around with making it into a Doom style game with a simple wave survival gamemode or a more slow paced, tactical experience similar to terrorist hunt from the Rainbow Six games. What has changed, however, is a crucial thing that was missing from the prototype; instead of a floating shotgun, the player character is now…well, a character with fully visible arms, legs, and a body!
Desired Features
Using a fully rigged 3D character over the already established game mechanics and feel was no easy task. I roughly planned the desired features and limitations for this character as follows at the start of the project:
- Use a “true first person” perspective by way of only using only one first person camera and one character mesh.
- Use Unreal’s aim offset feature to realistically have the upper body rotate with movement while keeping the arms and hands in specific pose locations when aiming down sights or not.
- Rotate the lower body of the character and camera smoothly when the maximum rotation of the aim offset is reached, or “turn in place”.
- Feature a bit of the ‘weapon sway/rotation lag’ on the arms that’s used to give guns weight in most FPS games when aiming around. Something like this from the Call of Duty games.
- Have the left hand follow the movement of the pump when moving it back and forth in pump mode.
- Push the arms back rapidly and rotate them upwards when firing to simulate recoil.
- Move the left arm to and from the location of new shells when spawned, follow the shells as the player moves them towards the tube, move back to the location of newly spawned shells, and change the hand pose to be holding the shell.
These are all of the main features of this system that I’ll be focusing on in this series, as well as the old features from the original prototype and a few others not mentioned here. In each part, (including this one!) I’ll refer back to this list on a feature by feature basis.
What's A "True First Person" Character?
There are several different viewpoints traditionally featured in first person games. Each of these viewpoints uses a camera set in a first person perspective (obviously, its in the name!) and a mesh used to represent the player character. The differences between these types of viewpoints reside in the character mesh, meaning the mesh used for your character is what ultimately distinguishes a “traditional” first person character from a “true” first person character.
A traditional first person character is what’s most commonly seen throughout FPS games new and old. It is simply a floating camera with a skeletal mesh of the character’s arms attached, which makes playing animations like reloading and recoil easy no matter the rotation of the camera. When looking down in this perspective, the camera sees no body or legs.
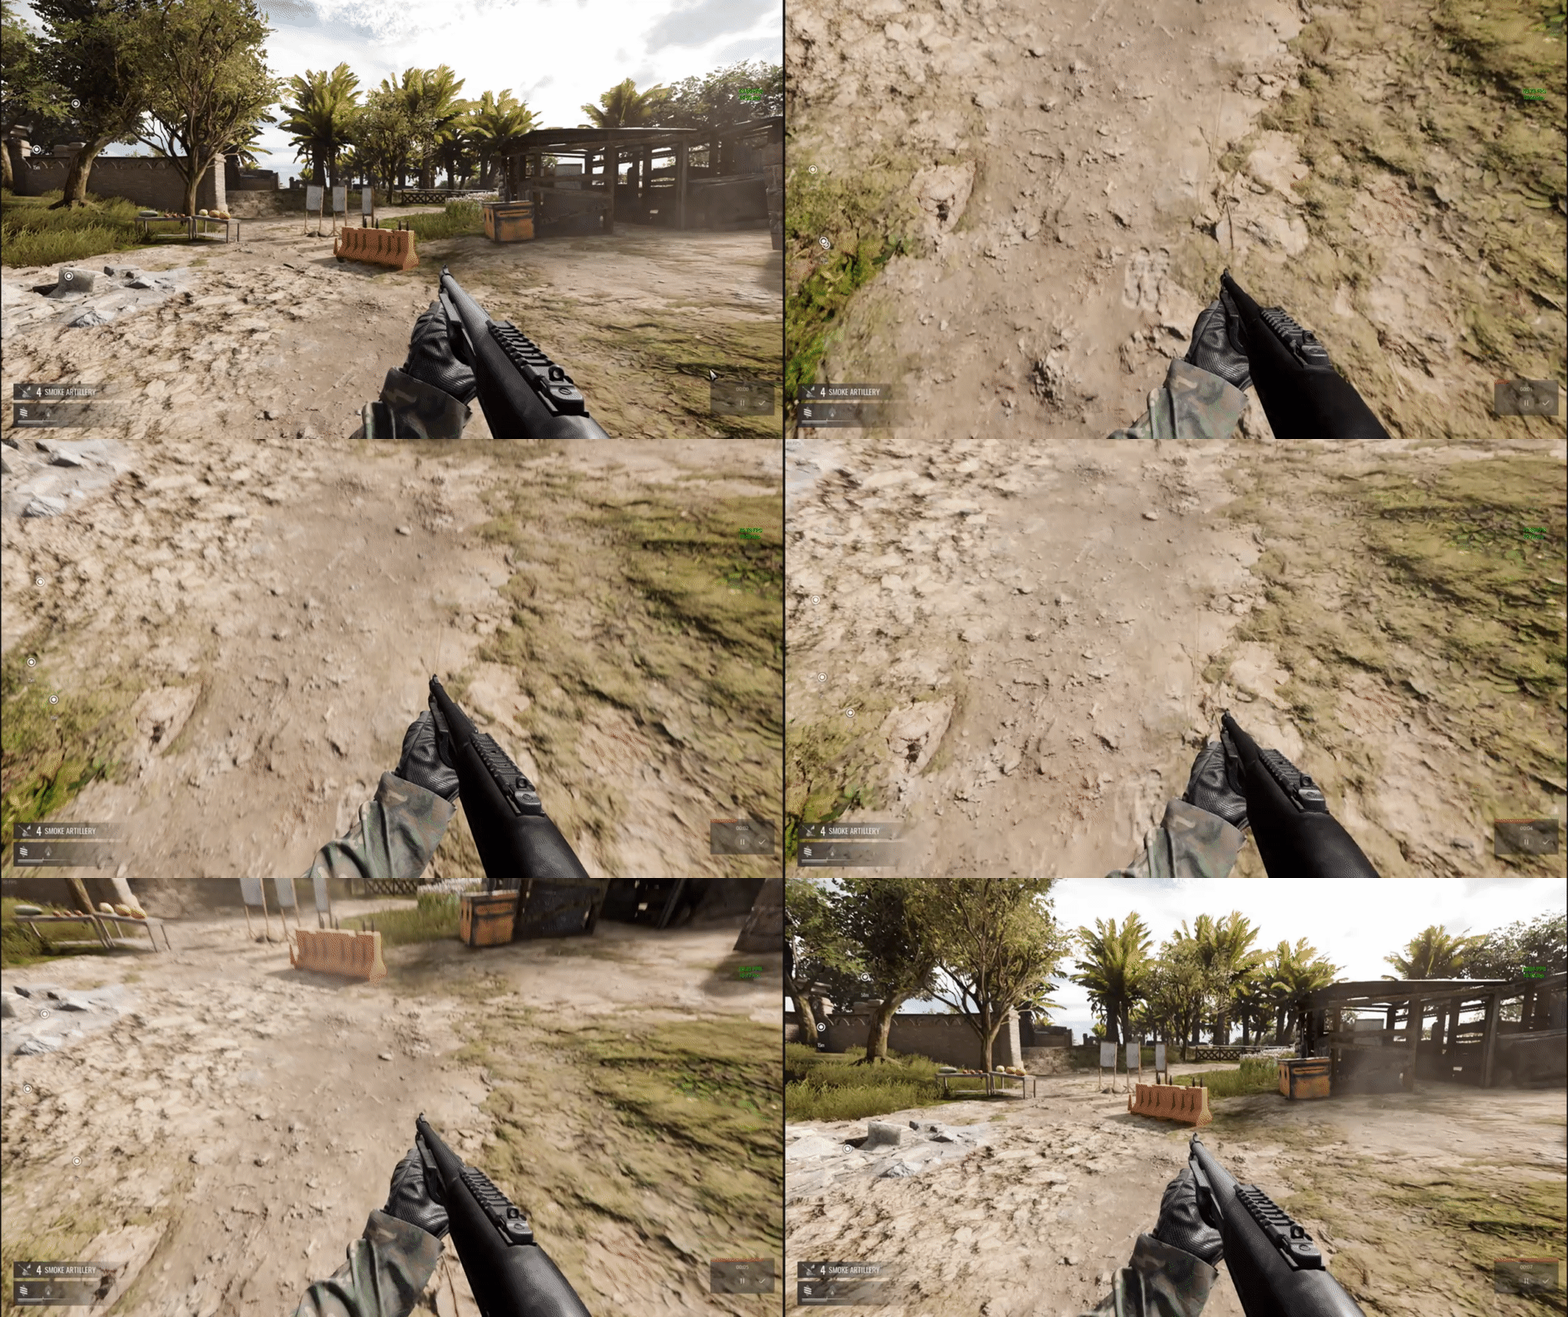
The second type of commonly used first person viewpoint uses the same arm mesh from the traditional style of character with an additional separate mesh for the legs. This provides a sense of immersion when looking down since the character’s legs are visible, but requires separate sets of animations for each of the meshes. Games like Halo, Escape From Tarkov (shown below), and the newer Battlefield games feature this sort of setup, which is easily distinguished by the lack of a body.

Finally, there’s true first person characters, which as you may have guessed, use one full body character mesh. Full body presence is achieved when looking down with this character, as the arms, chest, and legs are fully visible. Some games may choose to break the single mesh into individual pieces (body, arms, legs, etc) for more control, while others may use just one mesh. The advantage to using this setup is that any animations played in first person will automatically play in third person with the same fidelity, which significantly reduces the amount of animations needed for a multiplayer game or a game with first and third person views.
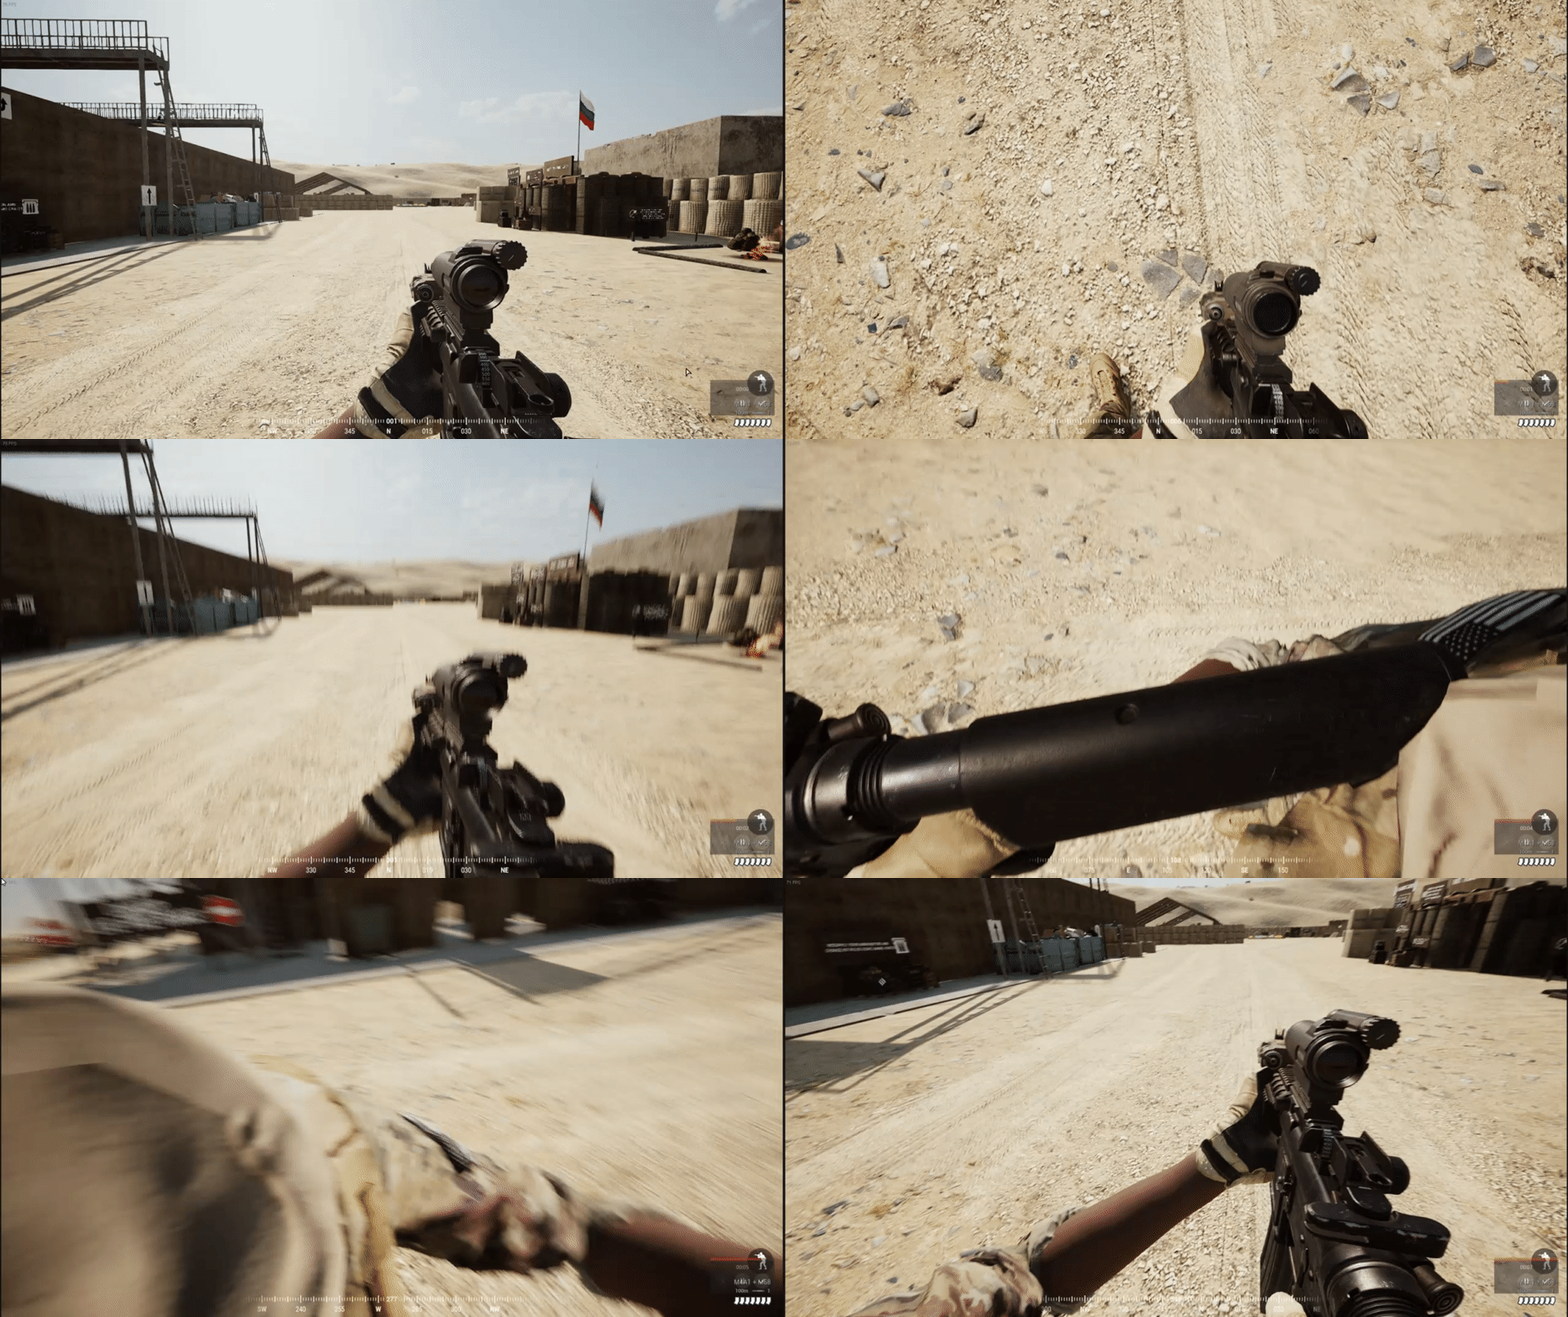
Implementing a true first person character like the one seen in the above gif is rather simple once the required assets are obtained and set up. There are two main elements to achieving this effect which I’ll break down step by step in the next section: attaching the camera to the head bone of the character and implementing a turn in place system that rotates the camera and legs after reaching a specific offset on the camera’s yaw axis.
Let’s jump into how to achieve this setup in Unreal Engine 4! I’ll be using Blueprints for the majority of these tutorial style sections in this and future posts, with C++ code being used as needed.
*Note: the tutorial esque sections of this series such as the following assume a basic understanding of Unreal’s interface and how to perform basic project and character blueprint/controller setup. If you don’t know how to setup a project and basic player character, there are a wide variety of tutorials available from Epic and other content creators, such as the Shooter Tutorial series from Andrzej Koloska. I’ll be digging into some specifics of code but not all of them, as I believe learning from experimentation and searching is the most effective way to learn! If there’s something you don’t understand, feel free to ask me about it in the comments!*
Step 1: Asset Setup
Before implementing the character and animation blueprints for a true first person character, we need to first acquire and setup the assets needed to drive the system. At a minimum, you will need the following:
- Full body humanoid skeletal mesh of your choosing. I’m using Epic’s UE4 Mannequin that comes with the engine’s third person template. You may also want a weapon mesh of your choosing, as this series will be using one throughout its duration.
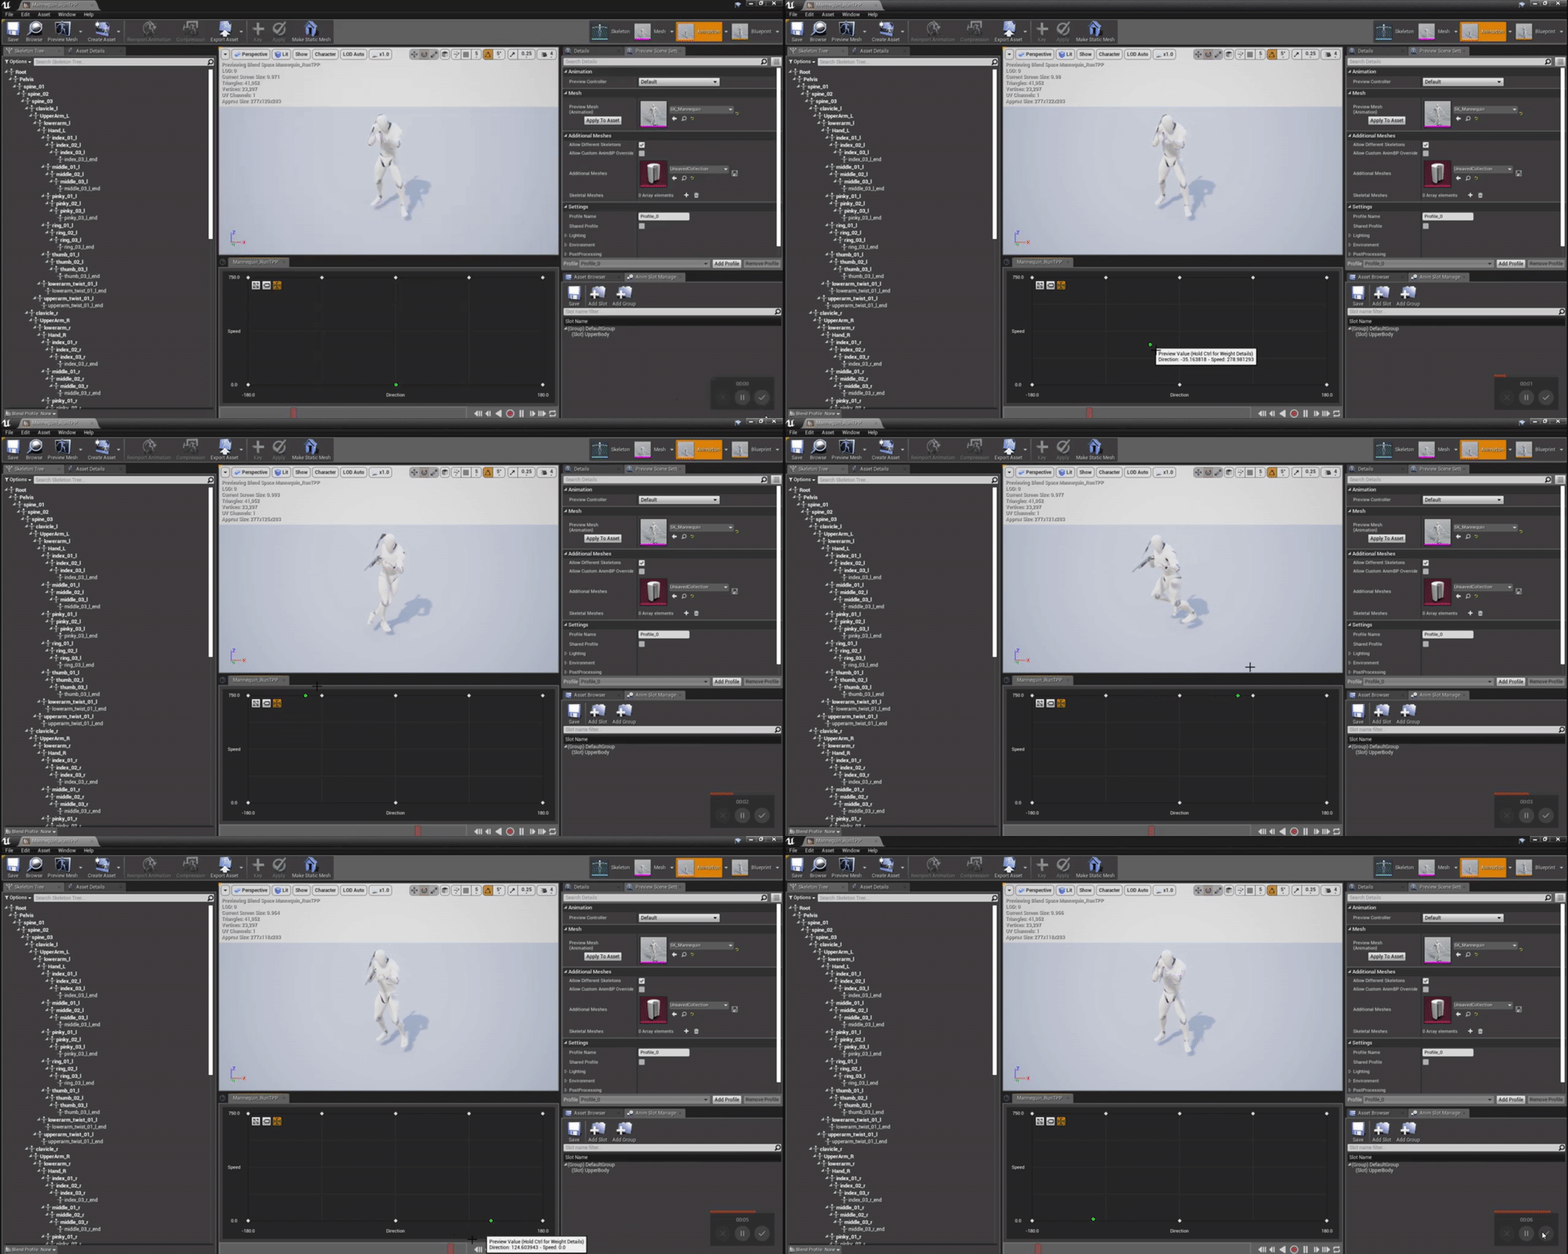
- Locomotion blendspace for controlling leg animations when running. I’m using the HeroTPP running animations from the Shooter Game example project by Epic, which you can find in the Unreal Marketplace in the Epic Games Launcher.
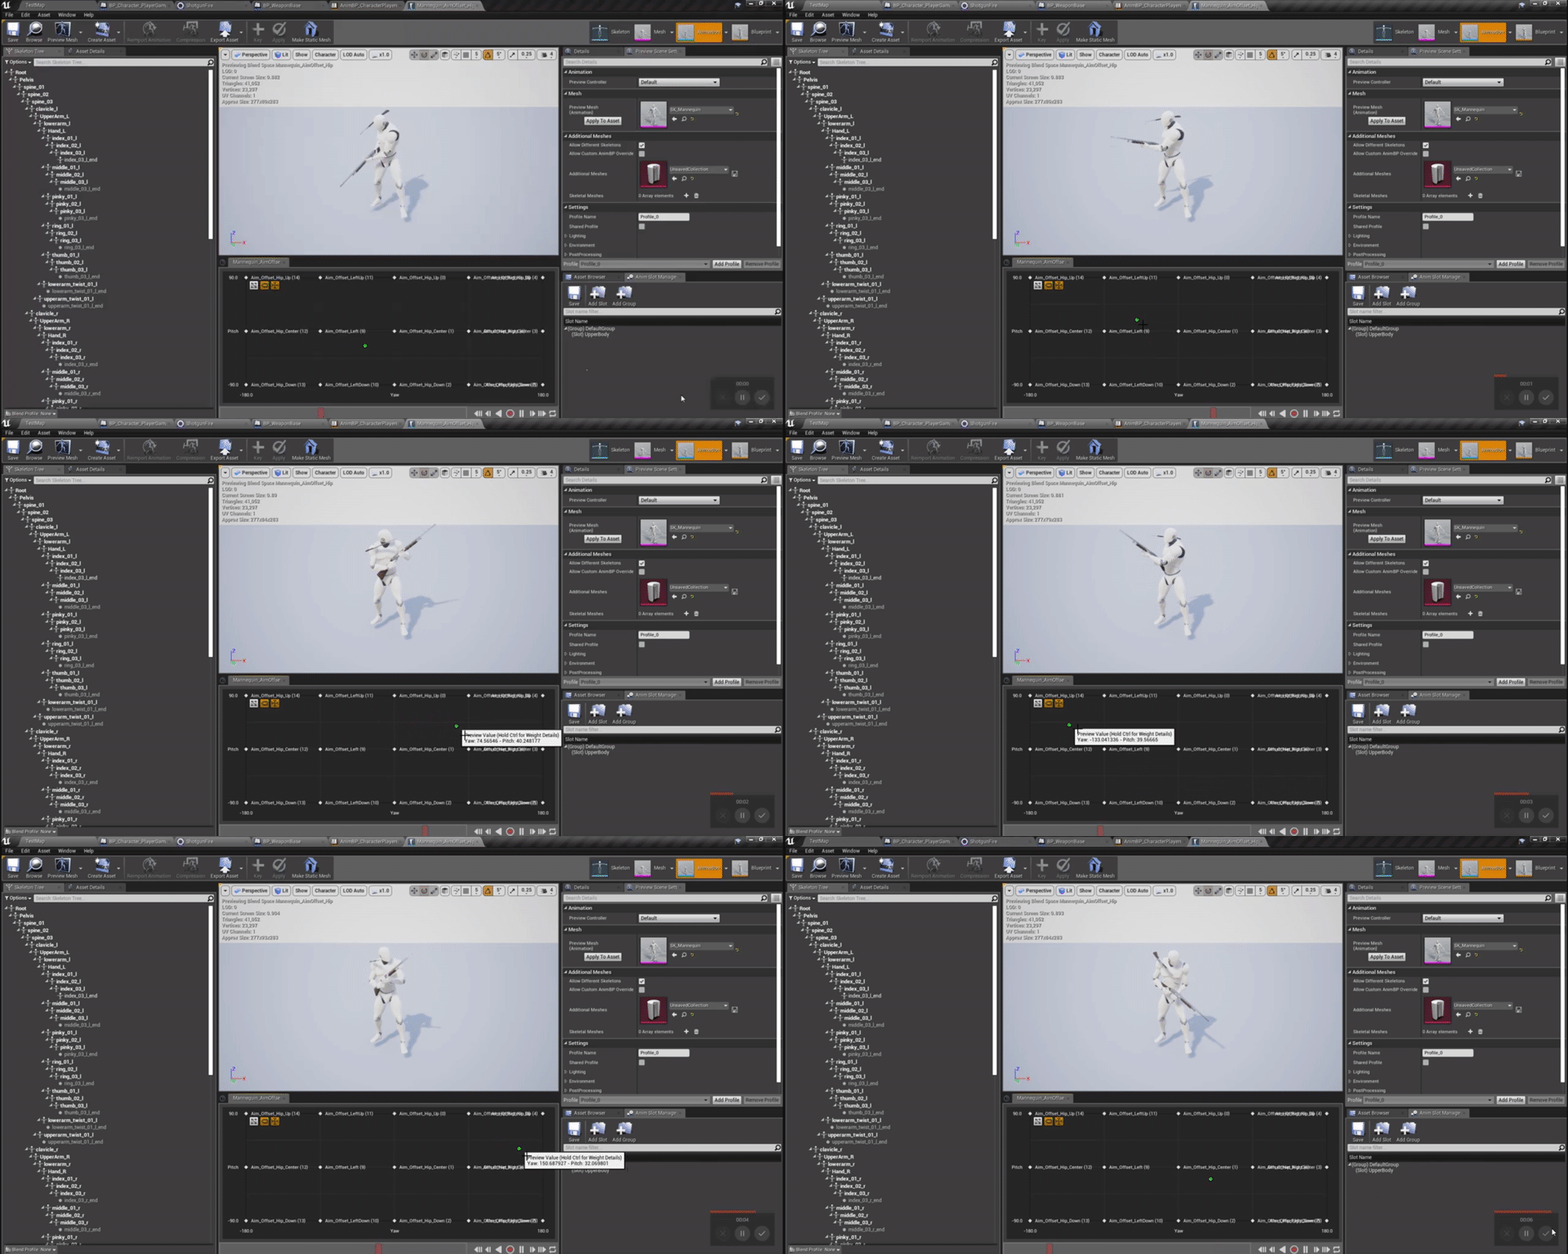
3. Aimspace assets for an Aim Offset, which will be used to control the rotation of the upper body when looking around. I’m using the AimSpaceHip asset from the Animation Starter Pack. You’ll have to separate these into poses to construct the Aim Offset asset, which you can learn how to do here!
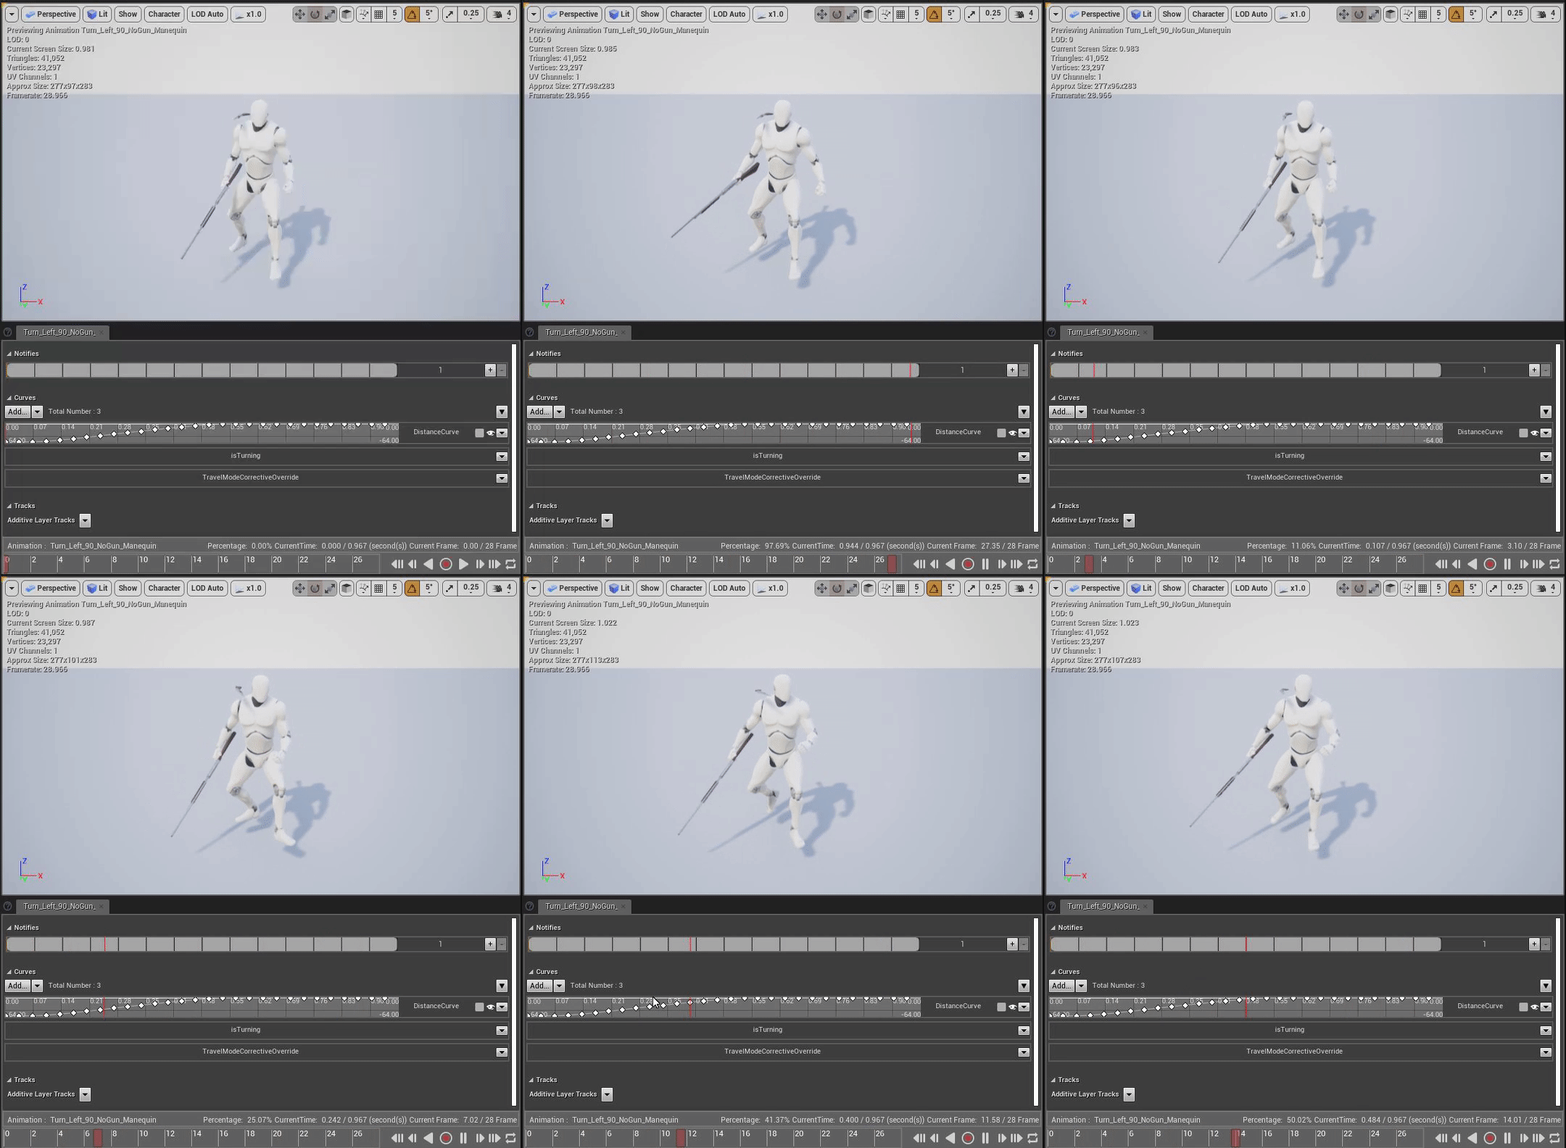
4. Turn in place animations and an animation curve within them. The curves will be used to drive the rotation of the camera in sync with the animation. I’m using the turn in place animations included with the Paragon Twinblast character from Epic, which have the curves built in!
Once you have all of these assets in place, go ahead and create a new C++ class inheriting from character (we will need to use C++ in later parts) and then create a blueprint from it. Also create a new animation blueprint for your character mesh if you haven’t already. The majority of the code will be handled within the anim blueprint, but some initial setup needs to be done in the character blueprint before proceeding.
Step 2: Character Blueprint & Camera Setup
For this part of the true first person system, we don’t need to modify any of the code in the character blueprint event graph, but we need to edit some parameters in the viewport in order to get the camera in the correct position and ensure mouse movements are handled correctly.
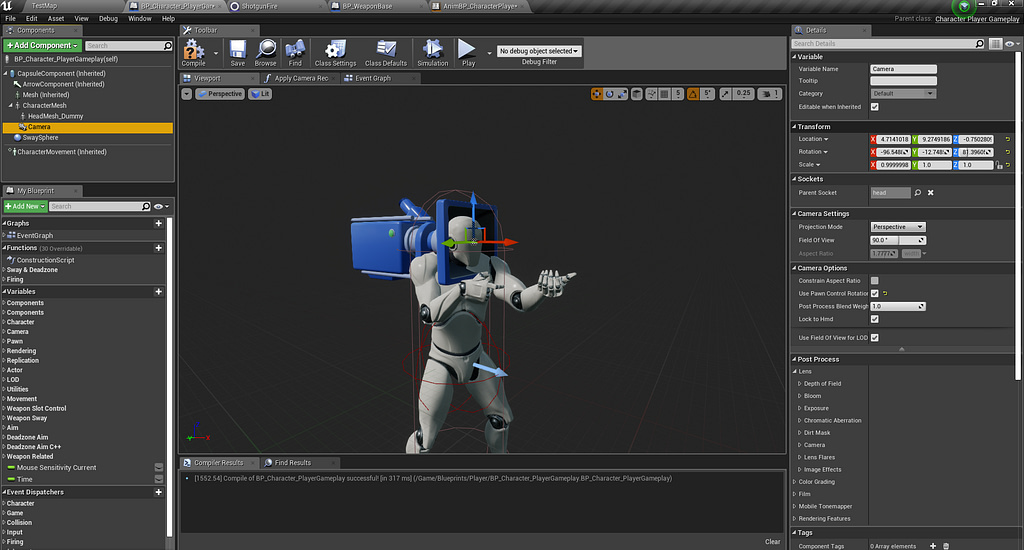
First, select the mesh component and set it to the character mesh of your choosing. You should now see the preview of the mesh in the viewport. Next, select the camera component and enter its Details panel. We want the camera to be positioned at the location of the head bone and automatically follow its rotations when using the Aim Offset. To achieve this, first attach the camera to the head bone directly under the “Parent Socket” dropdown. This will now ensure the camera always follows the head bone location and rotation. *Note: make sure any animations you use do NOT have any sort of movement or rotation on the head bone. It must be completely steady in any animations, or else it will move all over and make your players motion sick!*
Next you’ll need to position and rotate the camera so that its facing forward from the location of the mesh’s face. The center ball on the transform gizmo should be about halfway up the face on the upward axis and about 3/4’s of the way to the edge of the face on the forward axis. This may take some tweaking depending on how much of the body you want to see when looking down.
Finally, under Camera Options in the camera’s details panel, make sure that “Use Pawn Control Rotation” is checked. This will make sure that the camera’s rotation follows the view rotation of the player controller and keeps it at a steady level. Otherwise, the camera would be rotated relative to the head, which doesn’t look correct at all! Additionally, open “Class Defaults” and check “Use Controller Rotation Yaw”, which will ensure the character rotates on the yaw axis relative to mouse movement on the yaw axis. This is required for using the Aim Offset and turn in place.
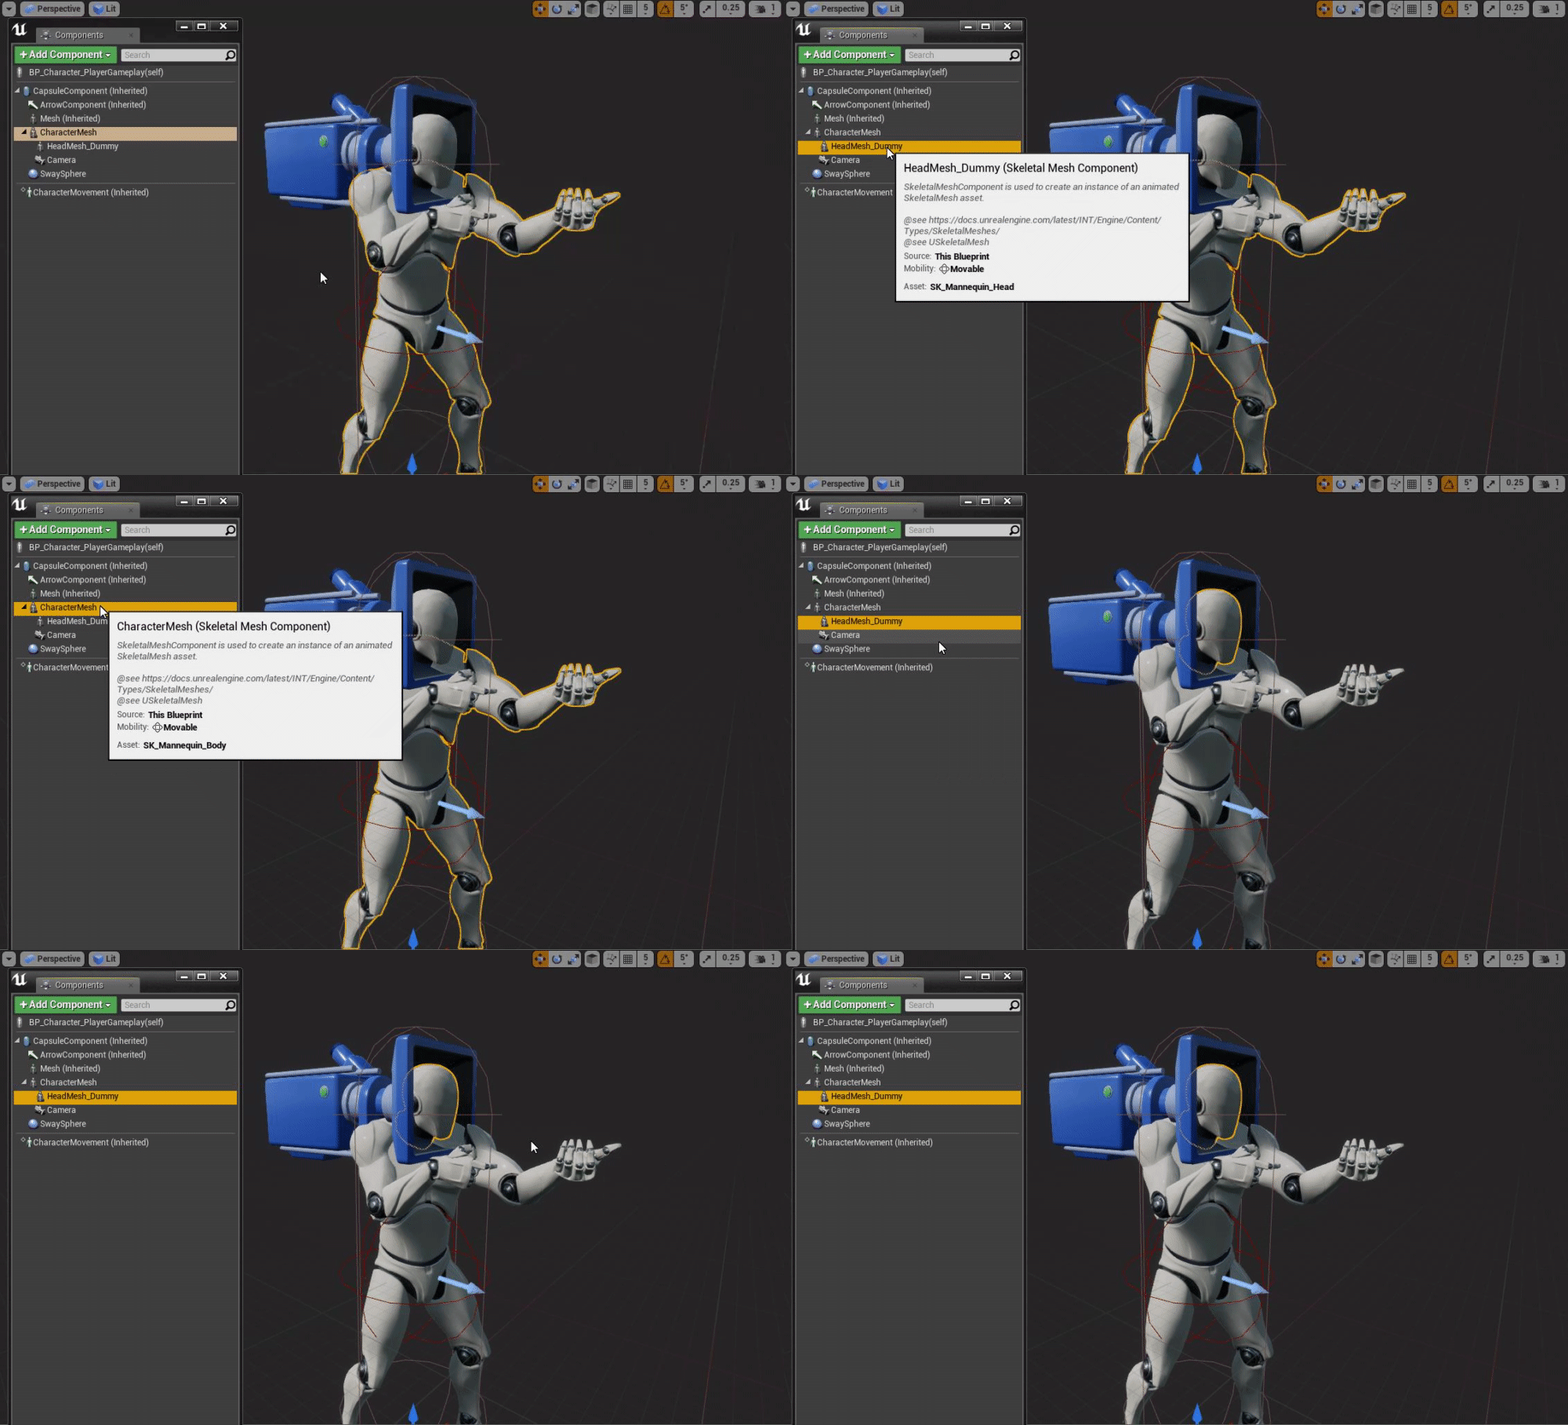
You may have noticed that I have two separate mesh components in my blueprint, one for the body and one called “dummy head”. The trick is to disable the “visible in game” property for the head but enable “hidden shadow” under its lighting properties. This will display the shadow of the head while preventing any clipping from occurring. You’ll need to use a 3D program like Blender or Maya to separate the head.
Step 3: Anim Blueprint Basics & Aim Offset
Next we’ll be getting into the main component of the true first person system: the aim offset and basic locomotion animations that we’ll be able to see when we run around and look down. This section uses a little bit of some basic code as well as a slightly complex anim graph setup for the aim offset.
First create a basic state machine for the ground locomotion and add states for idle and for the locomotion blendspace created earlier. This is also where you can add any other states like jumping, crouching, etc. Hook the states up with basic back and forth transitions based on a speed variable which we’ll set in the event graph. Save this state machine into a cached pose for feeding into the aim offset.
Now we want to move into the event graph and get some basic variables set up:
- float “Speed”
- Used for Idle and Locomotion transition as well as the locomotion blend space
- float “Direction”
- Used for locomotion blendspace direction
- float “Roll”, “Pitch”, and “Yaw”
- Roll and Pitch are not required but useful to have if you need to access the rotation of the character actor. Yaw is needed for turn in place, however
- float “Yaw Last Tick” and “Yaw Frame Change”
- Used later for turn in place. Last tick will store the yaw value from the previous frame, yaw frame change will store the difference between Yaw Last Tick and Yaw
- bool “isAccelerating”
- Used for determining whether or not to enter turn in place later on.
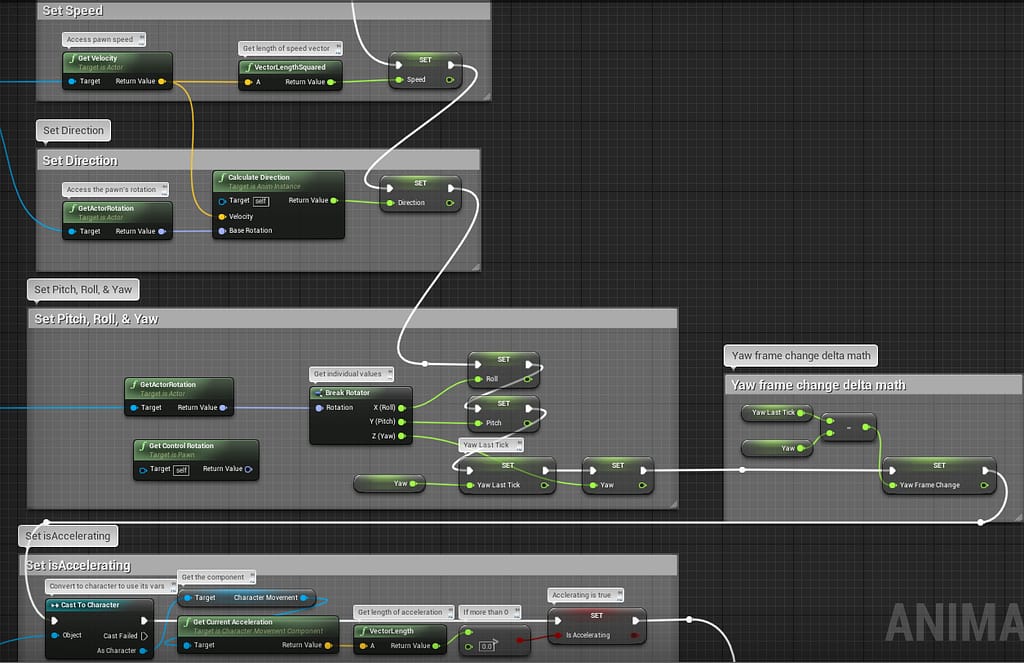
After setting “isAccelerating”, create float variables for “AimPitch” and “AimYaw” to use for the aim offset values. Then set these variables using the basic aim offset implementation below. This is all for the event graph for this step!

Now for the more involved part; setting up the aim offset animations. Head back into the anim graph and get a reference to the ground locomotion cached pose from earlier. This will be the starting point for our aim offset. Drag off of the node and add in the AimOffset asset created earlier from the aimspace poses. Drag off of ONLY the yaw pin and set the yaw to the AimYaw variable for now. Later this will be the RootYawOffset variable once turn in place is setup. Go ahead and create a new cached pose from this node called “AimOffsetYaw” or something similar.
In order to prepare the aim offset for using the turn in place in the next step, we need to separate the upper part of the body from the lower part of the body. The upper body will control the aim offset while the lower body will control the leg rotations and movement from the locomotion blendspace. To do this, simply add a Layered blend per bone node with the AimOffsetYaw cached pose as the base and an idle pose of your choosing as the blend pose. Set the blended bone in the Details panel to the pelvis bone with a blend depth of about 4 and enable Mesh Space Rotation. Now you’ll be able to look left and right, but not up and down. Make this into a new cached pose called “UpperBody”. You can also plug this into a slot as well for any anim montages you wish to play on the arms.
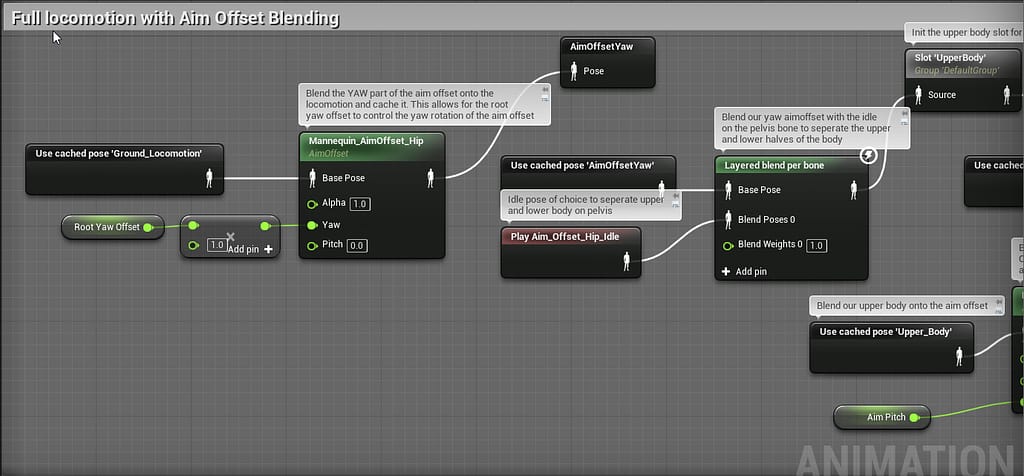
We can’t look up and down yet because the idle pose automatically overwrites any pitch rotation of the aim offset when the upper and lower bodies are separated this way. This is because we don’t have “Use Controller Rotation Pitch” enabled in the character blueprint, which if enabled would prevent the character mesh from being seen when looking down. That’s why we only plugged in the yaw to the aim offset and fed it into the layered blend. If we fed in the pitch as well, we would be able to look up and down, but the arms would stay in place. The solution to this took a while for me to understand and was the cause of many headaches, so hopefully this explanation will save you some trouble!
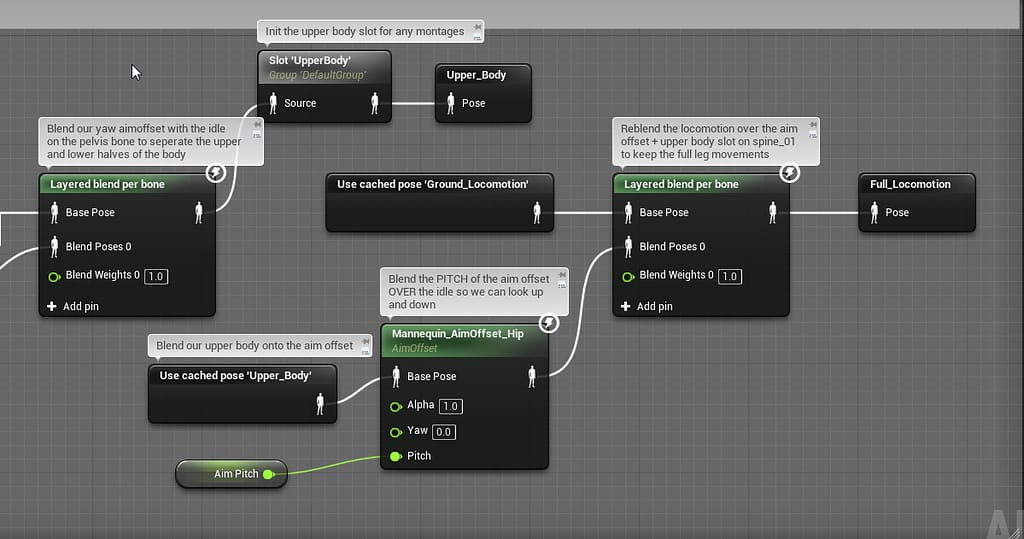
All we need to do to allow the aim offset to work on the pitch axis is to simply blend our upper body pose back on top of the aim offset using the AimPitch variable! Now we can look in any direction with the aim offset with a separated upper and lower body. However, if you look at the legs when running, you’ll notice that they appear to move very stiffly or not at full animation value. This is because when we blend the upper body onto the aim offset, we’re still blending an idle pose, which is forcing the legs to be restricted somewhat. To prevent this, use a Layered blend per bone on the spine_01 bone with the original locomotion cached pose as a base and the reblended aim offset pitch as the blend pose. Set blend depth to around 2 and enable Mesh Space Rotation. Now the legs should move at full speed when running!
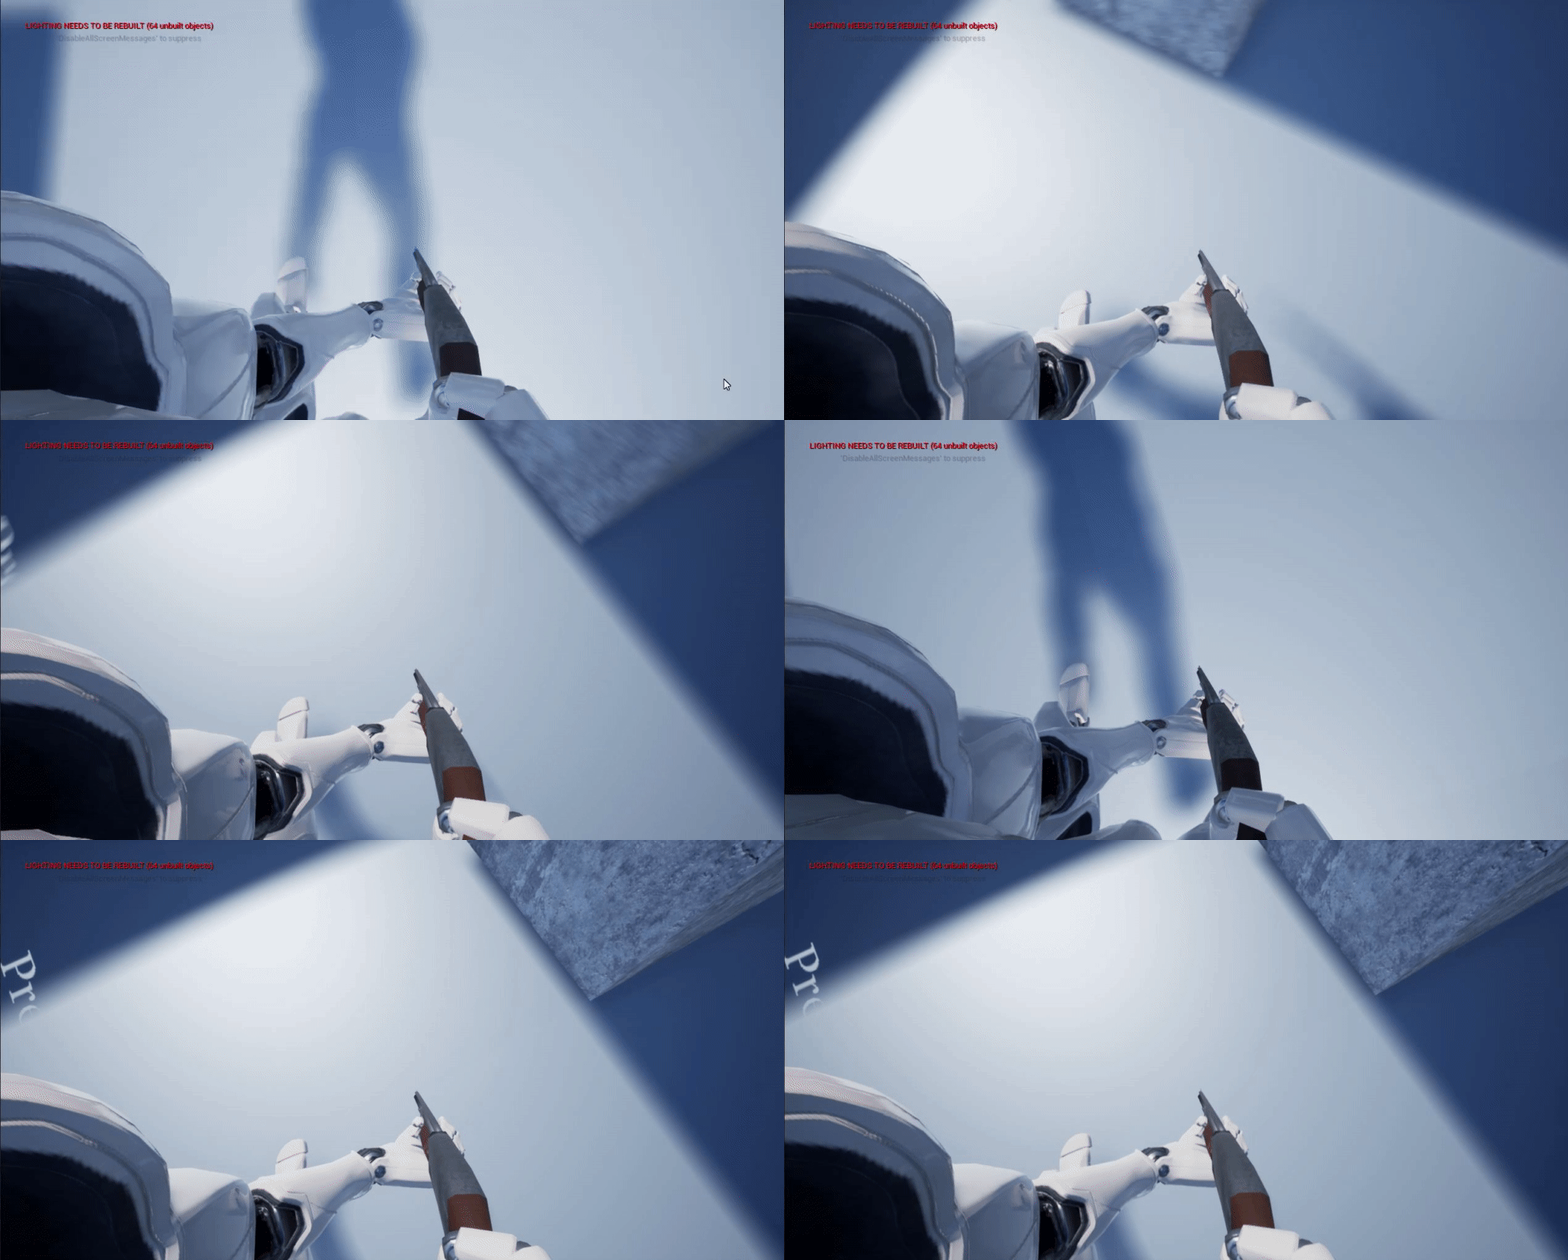
Here’s the result you should have at this point. We can see that the aim offset is successfully rotating, but the legs are rotating with it. All we need to do now is implement the turn in place event graph code to fully get the legs to appear separated from the upper body and playing the turn in place animation as well as rotating the camera after turning to the maximum extent of the aim offset.
Final Step: Turn in Place with Root Yaw Offset
*Note: When I was first trying to implement a turn in place system, I had a lot of trouble wrapping my head around it and didn’t even know how to begin implementing it. I ended up having to ask about it on the Unreal forums (which I encourage you to do if you ever need help with something and can’t find anything about it!), where I was pointed in the right direction by a fellow developer. It turns out that Epic has an excellent tutorial series dedicated to setting up an animation blueprint, with the 5th video in the series focusing on turn in place. I am currently using the code from that tutorial for this implementation, as it is the most reliable solution I could find. I strongly suggest watching at least the 5th video before implementing this, as I won’t go over the specifics of the code for it.
The turn in place system can be broken down into a small series of steps that must be executed in order to achieve the desired result:
- Get the value of the character Actor Rotation’s yaw every frame and store it in YawLastTick, which is set directly before the Yaw variable. We’ve already done this at the beginning of step 3.
- Get the difference between the YawLastTick and the Yaw and store it in Yaw Frame Change. Again, we’ve done this already in step 3.
- Check if the character is accelerating or has a speed greater than zero
- If true, keep the RootYawOffset at zero so we don’t turn in place when running and rotating
- If false, set the RootYawOffset to the NormalizedAxis sum of itself and the YawFrameChange.
- Update the root yaw offset according to the turn in place animations’ “isTurning” anim curve to rotate the character (and by extension the camera) as the legs rotate.
Phew, that’s a bit much to unpack. Luckily, steps 3 and 4 are rather easy to do once you understand the math behind it. Again, if you want a more in depth explanation of how this works, refer to the tutorial linked at the start of this section.
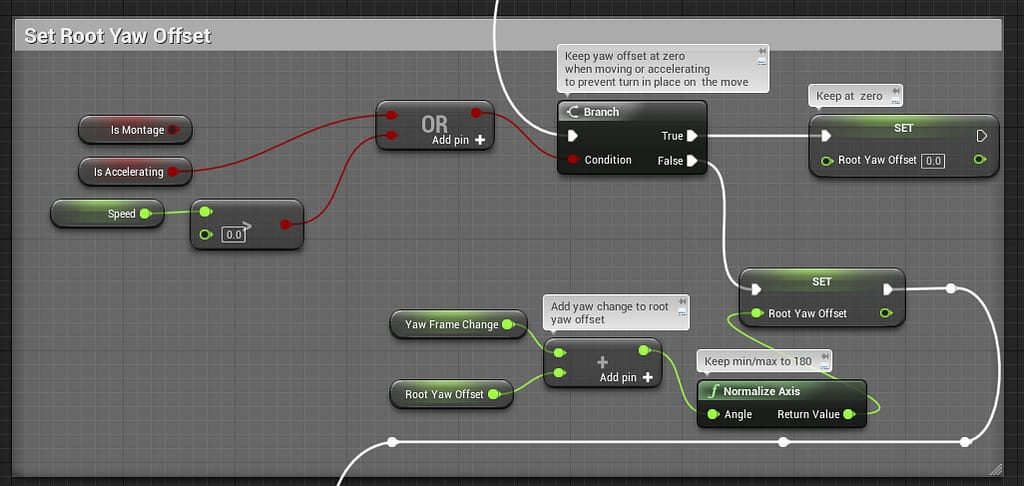
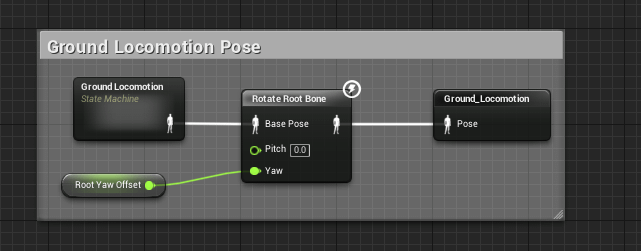
Now all we need to do is set the RootYawOffset variable according to the value of the turning curves from the turn in place animations. You’ll first need to add a new state machine in the GroundLocomotion state machine called Idle/Turns and make a transition between the idle state and turning states. Simply check if the root yaw offset’s absolute value is greater than 90 on the in transition and use an automatic rule based on sequence player in state on the transition back to idle. Make sure to also blend between the left and right turn animation depending on if RootYawOffset is greater than or less than zero!
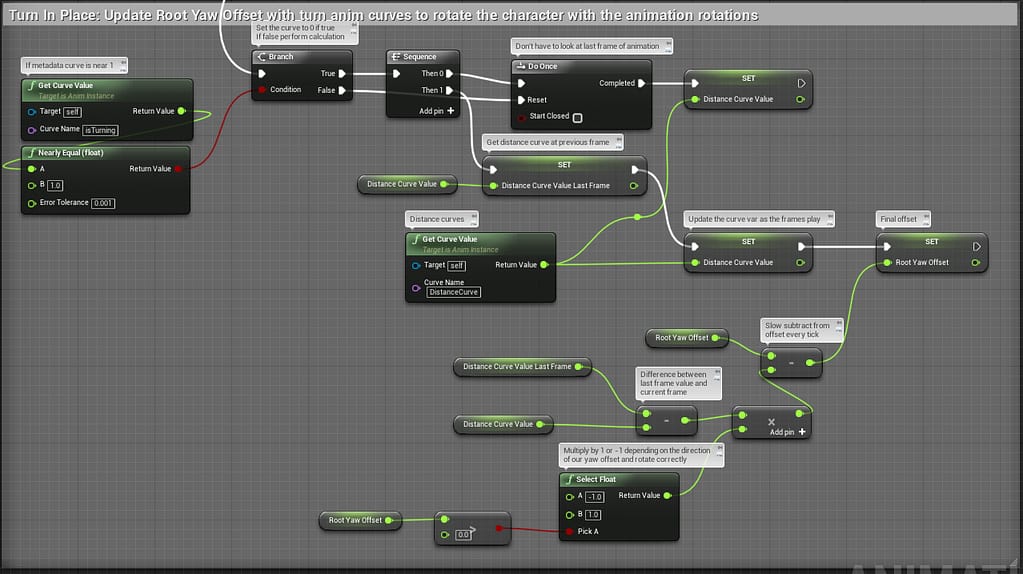
With the animations in place, make a branch off of the false condition after setting RootYawOffset in the first step. For the condition, check if the isTurning curve value from the turn animations is nearly 1, meaning it has reached the end of the curve. If it has, make a sequence and first use a DoOnce to prevent it from looking for the value at the last frame and set it to the current curve value in a new variable. If the curve isn’t at the end, simply reset the DoOnce to allow the operation to happen again.
In our true sequence, we want to next update our final root yaw offset as the distance curves play. To do this, we first get the distance curve value at the previous frame and store it in a new variable. Right after this, set the DistanceCurveValue variable itself to the current value of the animation curve. Subtract the current DistanceCurveValue from the DistanceCurveValueLastFrame, then multiply the result by -1 or 1 depending on the direction of the yaw offset (-1 being left, 1 being right). Finally, set the RootYawOffset variable to the difference between the current RootYawOffset and the distance curve delta calculation we just did to get the final RootYawOffset that will be calculated every frame when our condition is true. With this final bit of code, your turn in place should be up and running!
Result and What's Next!
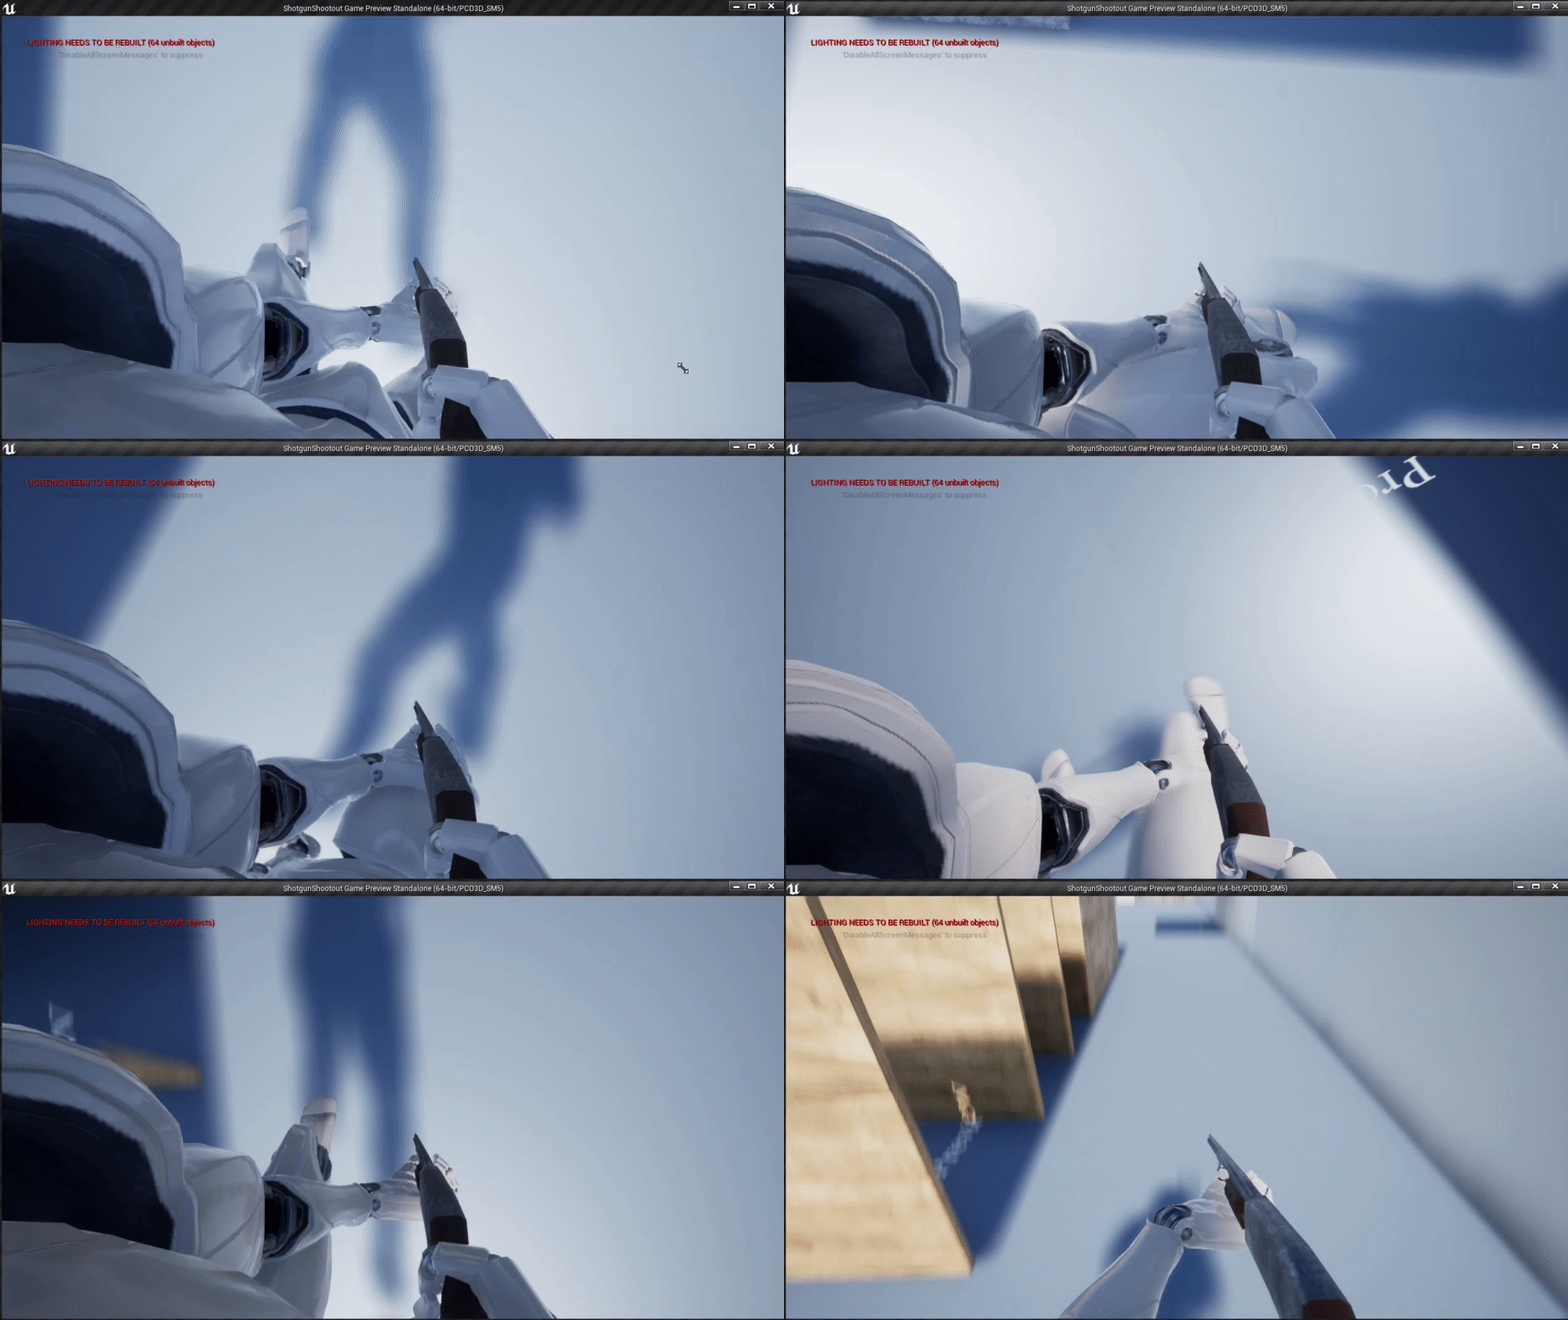
Here’s the result of all the steps! We can see the full body of the character when looking down, the aim offset is successfully separating the upper and lower body when we move the mouse, the legs and body turn in place when rotating 90 degrees, and we can see our run animation play when moving!
I hope you found this post interesting, informative and/or helpful for your own game! If you followed along using the same assets as me, you may have noticed that your arms and weapon mesh aren’t in the same spot as they are in the result gif. That’s because I’ve set up an Inverse Kinematics system to position the hands in a certain place and to hold the weapon correctly, as well as lay the foundation for procedural arm animations! I’ll be covering this system in the next part of this series, as well as a cool free aiming system similar to those seen in Red Orchestra 2/Rising Storm 1 & 2 and Insurgency Sandstorm!
I’m excited to keep documenting my progress with this game, as I’ve really had a fun time creating it. I hope you enjoy the concept of the game as well! Let me know what you think in the comments below!
See you next time,
– Karl
Next Part: Hand IK and Deadzone Rotation

Tyler
2 Mar 2022Im having an issue with applying montages… it seems that the last step of blending the pitch over the aim offset makes my mannequins arms shoot upward. Im thinking it has something to do with applying the same upper body animation onto itself is causing the issue but im strugging to find the fix