The Challenge
Recently, one of my favorite YouTubers (game audio pro Marshall McGee) posted a new episode of his series called “Waveform”. The series aims to explore how sound effects for entertainment like games and movies are made by providing examples and challenges to viewers to try and replicate the sounds even if they don’t have fancy recording gear (most of the videos focus on iPhone recordings). The latest episode covers how explosion sound effects are made. After interviewing members of Gearbox Software’s audio about their influences and processes for creating explosions and challenging them to make some explosion effects of their own, Marshall beaks down the three components of explosions: the transient, body, and tail. Marshall then makes an explosion of his own after talking about the importance of cadence when making “satisfying” sounds. He uses an iPhone microphone to record various household items and then walks through the process of turning them into an explosion. At the end of the video, Marshall poses a challenge to the audience (called the #GoRecord challenge); make an explosion sound effect using only a phone microphone and household items and submit them on Twitter for himself and the Gearbox audio team to judge. The winner (changed to three winners later on since there were so many entries) would receive the sample library from the other Waveform episodes.
(Check out Marshall McGee’s video below!)
I originally didn’t think I was going to have the time to do this challenge at first, but since I needed an explosion sound effect for my Game Production 2 game (Simple Sandwich: more on the sound design of that coming soon!), I figured I’d spend an afternoon making it. I’m really glad I did, because I was picked as one of the three winners!
Lets get into my process…
The Recording
A lot of different types of explosion sounds are found throughout entertainment, but I decided to focus on making a really harsh yet beefy one with a sort of “crumbling” texture to the body and a beefy initial transient and low end. There’s a couple of main items I used for the various different parts of this kind of sound. I first turned to my laundry basket since I knew it would give off a good punchy sound if I kicked it hard enough. I recorded some kicks and punches on the outside and inside of the basket, some with the phone inside and some outside. I intended to use this as one of the main layers for the body since it has the punchy and deep feel to it. as well as for some of the transient layers. Next, I took a bit of inspiration from the video and starting recording some cardboard mangling to get a violent sound for the transient.
I recorded a few hits on my clothes hamper for a deep impact for one of the body layers, and then decided to head out of my bedroom and to the kitchen for more sounds. In the kitchen, I recorded the sound of a ton of silverware being rustled around inside one of those utensil holder things to get some high end for the body and maybe the transients too. I found a Pringles can that I dropped on the floor and counter to get some impacts. The impact made this really loud yet metallic and mangled sound that I thought would be really cool for something (it turned out being integral to the sound). Lastly, I turned to the metal stools next to the counter top and dropped them on the ground a couple of times to get a harsh impact. With a lot of recorded source gathered, I headed up to my room to noise treat the samples and start layering!
The Transient
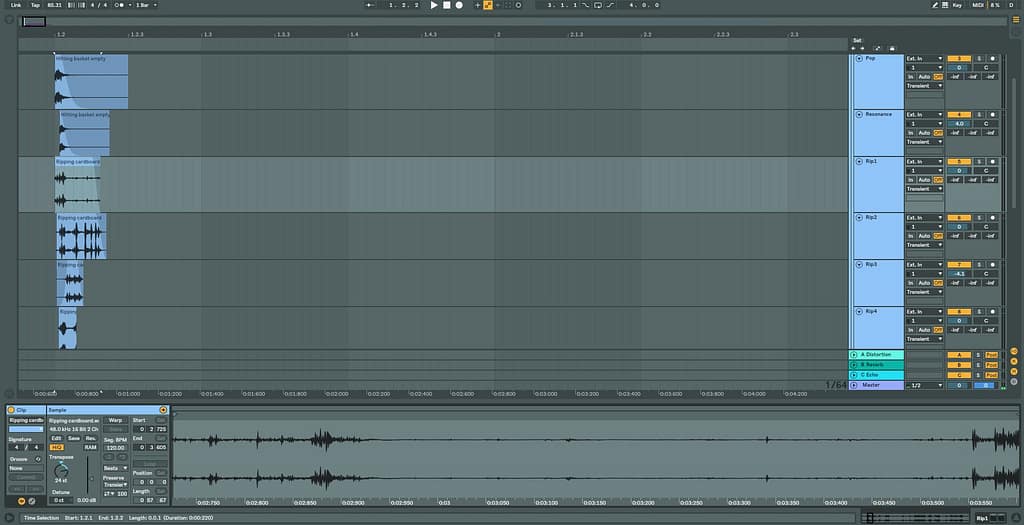
I began by layering the transient first before moving onto the body. I needed to get a really sudden, high-mid to high range burst that sounded harsh and explosion-y. My first instinct was to pull from the basket hits and pitch them up two octaves. They produced the nice mid and high frequency pop that I needed to get the initial burst of the explosion sounding sudden and powerful. I found that it still needed a lot more harshness, so I reached for my cardboard recordings since they were really gruff and violent sounding.
After sifting through the recordings for some good sounding bits, I made four separate cardboard layers each with their own unique part of the recording (since one on its own wasn’t harsh enough) and pitched them up to varying degrees (usually around two full octaves). With the cardboard added in the transient was coming along nicely, but it was a bit flat. I spaced out all the layers by around 20 ms or so to give them the sort of “satisfying” feeling cadence I learned about in the video. This produced a great result, and I called the transient a done deal.
Take a listen to the result:
The finished transient layer

The Body
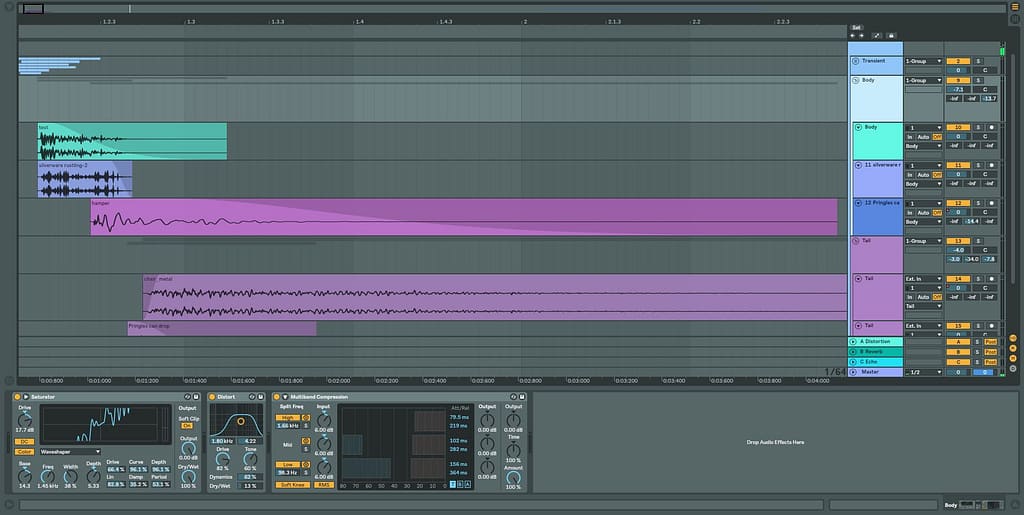
Now it was time to make the main (and most fun) part of the explosion: the body, or the actually explod-y sounding part! I used three main recordings for the layers of this part of the sound; a laundry basket hit layer for the oomph, a silverware rustling layer for lots of harshness and warble, and a layer of the hamper punching for even more low end and beef as well as a bit of an initial trail off.
I started playing with drastic pitch changes on all of these layers until I ended up with something beefy enough to make up the body while also having some grit to it. I pitched the laundry basket hit down 8st to make it a little more of a punchy initial “hit” of the blast. On the contrary, I drastically pitched up the silverware rustling to get a harsh and grinding bit to fill out the high end and provide some grit. Lastly, I pitched down the hamper layer drastically to about -30st. This really filled out the low end nicely while still providing some beef to the blast. With the pitching done, I moved the layers around in millisecond intervals til I got a good cadence.
Here’s the result:
Source arranged only with pitch changes : no effects
“…yeah, that sounds nothing like an explosion Karl”. I know, I know, trust me; I wasn’t super happy with this part of the sound at this point. It wasn’t until I started playing with effects that I started to really hear a satisfying explosion in this layer.
My first instinct to beef this up was to follow the video’s advice about using saturation and distortion. These two effects worked marvelously (huge props to the stock Ableton plugins by the way; they work wonders!) and made the previously dull thuds and scrapes come to life. I applied quite heavy saturation to the layers’ group (take a look at the photo below to see the effects chain) and a liiitle bit of distortion to squeeze some high frequencies out. Now it was sounding closer to an explosion, but the dynamics were all over the place. I turned to the trusty Ableton multiband-compressor (that I love oh so much) and applied the beef. A good trick I like to do for punchy sounds like this is to boost the lows a bit with the blue bars and then compress downwards on them a tad when they get overpowering. I didn’t have to play too much with the settings to get the dynamics sounding right, but I loved the final result of the body after I glued it all together and beefed it up with the effects.
Take a listen:
The finished body layer with full effects: crunchy and beefy!

The Tail
Last but not least came the tail of the explosion. This part was integral to making the explosion convincing and have presence, so I knew I needed to get it right. I had to experiment quite a bit with my recordings to find something with a nice low end and trail to it, but I eventually ended up settling on using the metal chair stool impacts and the Pringles can dropping for the tail. Making the tail was pretty straightforward once I had the samples. I started by pitching both of them down as far as I could without any artifacts.
Around -36st was the sweet spot, especially for the chair. There was some hissing left over from the room recording and part of the metallic texture, so I applied a basic high cut EQ to both of the layers to get rid of that and also shift focus to the low end frequencies. The pitched down chair created a super nice long trail that even has a bit of resonance to it thanks to the metallic texture, while the Pringles can provided a layer of oomph to the tail thanks to the impact and the hollow texture it had.
For effects, I used my favorite compressor (the Waves CLA-76) to smooth the dynamics out a bit while still giving a little extra oomph, as well as some simple reverb and delay sends to make the tail last even longer.
Here’s the result of the tail:

The Explosion
With all the layers done, all that was left to do was arrange them for cadence and apply some master effects to the layer group buss. I used the CLA-76 again to get the peaks of the explosion pumping a bit for even more oomph and beef, more multiband compression to treat the dynamics a bit and increase the low end a bit more, and lastly applied a little high cut to get rid of some harshness that was just too damn harsh. And that was that! I was really satisfied with the result of my work. The whole process only took about 3 hours.
Here is the final result!

Challenge Results and Reflection
As I mentioned, my explosion ended up being picked as one of the three winners in the GoRecord challenge! I was so happy when I first heard the news. The competition was very stiff and all of the submissions were awesome! I hope the next episode of Waveform features another GoRecord challenge as this was a great exercise for me.
I feel that this challenge helped me grow substantially in my second major focus area (sound design). I think that it helped me start getting a sort of “intuition” about what could sound cool for a specific kind of sound, since now whenever I look at household objects I think about what kinds of sounds I can make with them. I also think it helped a lot with my confidence in my sound design work. While I’m typically pretty confident in my ability to design sound effects, I’m still fairly new to the world of sound design and often ask everyone around me if the sounds I’m making actually sound like the in-game visuals. I feel that the success of this exercise and the success in being one of the winners has not only made me more confident in my abilities but has also helped validate that I have what it takes to be a successful sound designer.
Here’s a link to the winner’s thread for the contest so you can hear the other submissions!
Thanks for reading, and I’ll see you next time!
– Karl


Pingback: Simple Sandwhich – KARL LEWIS
Pingback: Systems Prototypes – KARL LEWIS